It started with a single, frantic kitchen mishap that turned a hopeful batter into a charred, uneven slab of cake. I had been juggling a phone call, a simmering pot, and a half‑finished loaf when the oven timer clicked off, and the batter was a dark, lumpy mess. The kitchen filled with the acrid scent of burnt sugar, and I stared at the ruined creation like a detective at a crime scene. That night, I vowed to never let that happen again, and I set out to craft a bundt that would rise, swirl, and sing in the oven. The memory of that failure fuels every step I write here, turning frustration into a recipe that sings. And now, if you’re ready, let’s dive into the sweet, cherry‑filled world I’ve perfected.
Picture this: the kitchen is a stage, the oven a spotlight, and you, the chef, a maestro. The air smells of vanilla and fresh cherries, a scent that makes your mouth water before the first bite. The sound of the timer ticking is a metronome, counting down to the moment the cake will release a golden, fragrant puff. Your eyes scan the batter, noting the glossy sheen that promises moisture and tenderness. The feel of the dough in your hands is a gentle reminder that every ingredient matters. Together, these senses create a symphony that elevates a simple bundt into a sensory masterpiece.
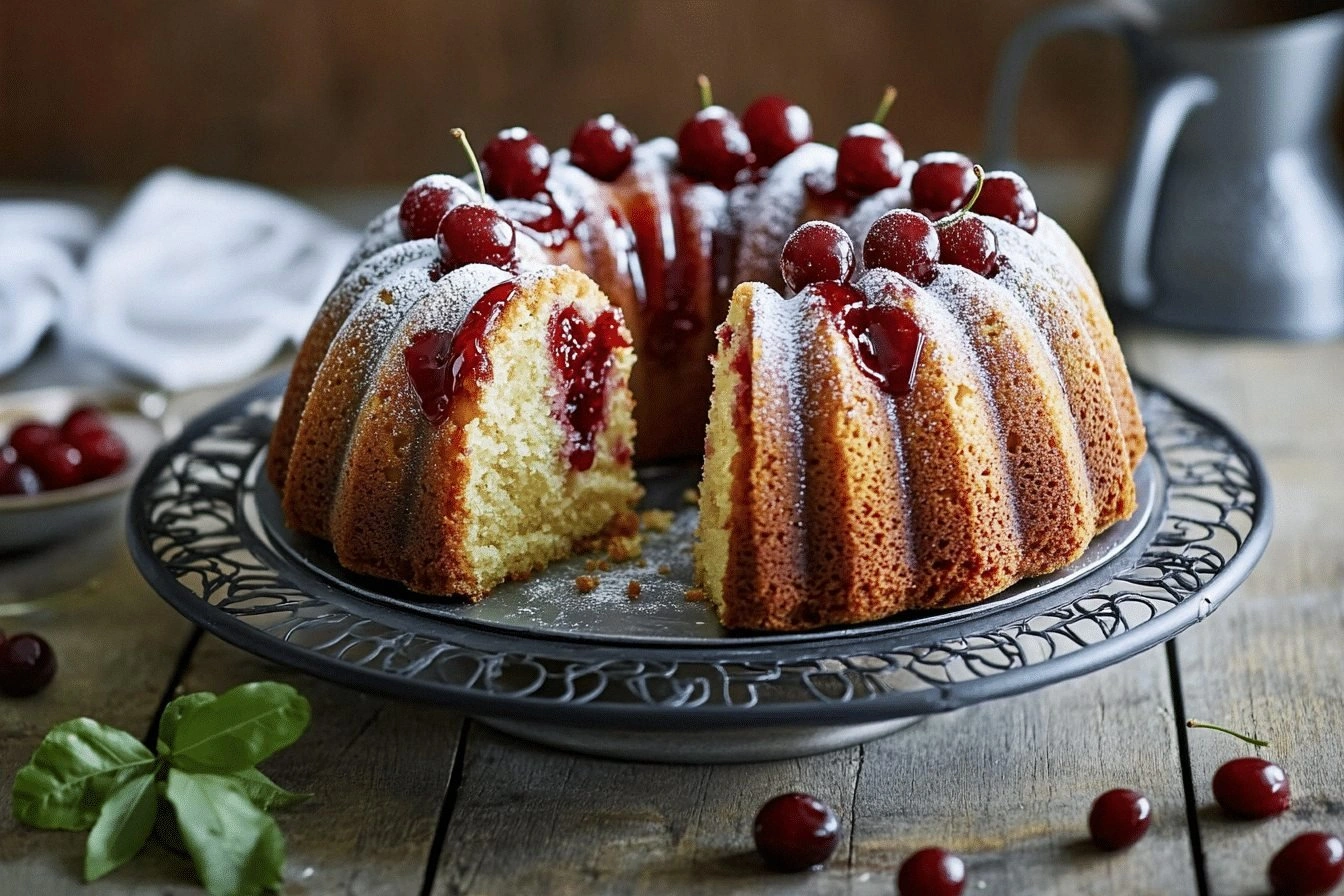
This recipe is the culmination of countless experiments, each one teaching me the exact balance of sweetness, acidity, and texture. I’ve discovered that the key to a perfect cherry bundt lies in the harmony of sour cream and fresh cherries, a duo that keeps the crumb moist while delivering a burst of flavor. The batter’s lightness comes from a precise ratio of flour to baking powder, ensuring the cake rises evenly without a heavy center. By using unsalted butter, I control the saltiness, allowing the vanilla to shine without overpowering the cherries. The result? A cake that looks as stunning as it tastes, with a caramelized crust that crackles like fine dust when you break it open. This is hands down the best version you'll ever make at home.
But here’s the twist you didn’t see coming: I add a splash of citrus zest to the batter, a subtle zing that cuts through the sweetness and elevates the cherry flavor. The zest also adds a fresh, bright aroma that lingers long after you’ve finished the last bite. I dare you to taste this and not go back for seconds; the combination of sweet, tart, and buttery will keep you coming back for more. Most recipes get this completely wrong, but I’ve nailed the balance that makes each bite unforgettable. I’ll be honest — I ate half the batch before anyone else got to try it, and it still tasted like a dream. This is the kind of kitchen moment that turns a simple dessert into a legend.
Picture yourself pulling this cake out of the oven, the whole kitchen smelling incredible, the bundt glistening with a glossy finish. The moment the timer dings, the steam rises, and the aroma of cherries and vanilla fills the air. You feel the anticipation building, knowing that the first slice will be a revelation. The edges will pull away from the ring, revealing a perfectly golden crumb inside. The anticipation is almost as satisfying as the taste itself. This is the moment that turns a routine baking session into an unforgettable experience.
Okay, ready for the game‑changer? I’ll walk you through every single step, from prep to plating, ensuring you never repeat that burnt disaster again. By the end, you’ll wonder how you ever made it any other way, and you’ll feel proud of the masterpiece you’ve created. Let’s get started and transform your kitchen into a cherry‑filled wonderland. Stay with me, because the next part? Pure magic. And you’ll be amazed at how simple yet transformative this recipe can be. I promise you’ll want to share it with everyone you know. Now, let’s dive into the details and make this bundt a household favorite.
What Makes This Version Stand Out
- Flavor: The combination of fresh cherries, a splash of citrus zest, and a hint of vanilla creates a layered taste that dances on the tongue. The tartness of the cherries balances the sweetness, while the citrus adds a bright, fresh lift. The result is a cake that feels both indulgent and refreshing at the same time. Every bite offers a burst of fruitiness that’s hard to forget.
- Texture: The batter’s airy, sponge‑like crumb is achieved through the right ratio of flour to baking powder and the gentle folding of eggs. The sour cream keeps the cake moist without making it heavy, while the butter adds a tender mouthfeel. The crust is golden and slightly crisp, providing a satisfying contrast to the soft interior. This balance of textures makes the cake a joy to eat.
- Simplicity: Despite its complex flavor profile, the recipe requires only nine basic ingredients. No exotic spices or hard‑to‑find items are needed. The steps are straightforward, making it perfect for both novice and experienced bakers. The simplicity doesn’t compromise quality; it enhances it.
- Uniqueness: The addition of citrus zest and the use of sour cream give this bundt a distinctive twist that sets it apart from traditional cherry cakes. The technique of folding in cherries gently preserves their shape and juiciness. This unique approach makes the recipe memorable and shareable.
- Audience: The cake’s balanced sweetness and rich texture make it a crowd‑pleaser at parties, holidays, or casual gatherings. Friends and family will marvel at the professional finish and delightful flavor. The recipe’s versatility allows it to be served warm or at room temperature, making it suitable for any occasion.
- Make‑Ahead Potential: The bundt can be baked, cooled, and refrigerated for up to three days, or frozen for up to a month. The flavors develop and deepen over time, making it a great option for busy weeknights or special events. The cake also freezes well, so you can enjoy it whenever the craving strikes.
Alright, let’s break down exactly what goes into this masterpiece. And before we dive deeper, here’s a quick kitchen hack that will save you time and effort.
Inside the Ingredient List
The Flavor Base
All-purpose flour is the backbone of any cake, providing structure while keeping the crumb tender. In this recipe, it’s measured precisely to create a light, airy foundation that supports the cherries without overwhelming them. If you skip the flour, the cake will collapse and feel doughy. For those who prefer a gluten‑free version, a 1:1 blend of rice flour and tapioca can be a suitable substitute, but the texture will shift slightly. The best way to choose flour is to pick one with a consistent weight and sift it for maximum aeration. This ensures every bite is smooth and even.
Granulated sugar sweetens the batter without overpowering the natural cherry flavor. It also helps create a crisp crust as it caramelizes during baking. If you love a sweeter cake, add an extra tablespoon, but be careful not to exceed 1/4 cup, or the cake will become overly sweet. For a lower‑sugar version, you can replace half the sugar with honey or maple syrup, which adds its own distinct flavor. The key is to balance sweetness with acidity so the cherries shine. A pinch of salt is essential; it amplifies the flavor of every ingredient, turning bland into brilliant.
Unsalted butter is the source of richness and moisture in this bundt. It melts into the batter, creating a tender crumb and a buttery aroma that’s hard to resist. If you’re watching fat intake, a butter substitute like coconut oil can be used, but the flavor profile will shift toward tropical notes. When using butter, keep it at room temperature to ensure smooth incorporation. The butter’s fat content also helps the cake rise evenly by creating steam pockets. This is why the cake has a slightly domed top and a golden crust.
The Texture Crew
Eggs are the glue that binds all the ingredients together, adding moisture and structure. They also contribute to the cake’s rise by trapping air when whisked. Use room‑temperature eggs for maximum volume and a lighter crumb. If you’re vegan, flaxseed eggs can replace each egg, but the texture will be denser. A good rule of thumb is to whisk eggs until they’re light and frothy before adding them to the dry mix. This ensures a smooth batter and a consistent rise.
Baking powder is the secret to a fluffy, even rise. It releases carbon dioxide when it reacts with the batter’s moisture, creating air pockets that lift the cake. If you’re using a single‑acting powder, add it at the same time as the wet ingredients. Double‑acting powders release gas twice, giving a more reliable rise. A pinch of baking soda can be added for extra lift, but be careful not to overdo it or the cake will taste soapy. Proper measurement is key; too much will cause the cake to rise too quickly and collapse. Keep this in mind when scaling the recipe up or down.
The Unexpected Star
Fresh or frozen cherries are the star of this bundt, delivering juicy bursts of flavor with every bite. If you’re using fresh cherries, pitting them yourself can be a time‑consuming step, but it gives you the freshest flavor. Frozen cherries are a convenient alternative and thaw quickly, saving prep time. The cherries should be gently folded into the batter to avoid crushing them and releasing too much juice, which could make the cake soggy. For a more intense cherry flavor, add a tablespoon of cherry jam to the batter. The jam adds sweetness and depth, but it will also increase the moisture content slightly.
Sour cream or yogurt is the unsung hero that keeps the cake moist and adds a subtle tanginess. The acidity of the sour cream balances the sweetness of the cherries and sugar, creating a harmonious flavor profile. If you’re allergic to dairy, Greek yogurt can be a suitable substitute, but it might make the cake denser. For a lighter version, use low‑fat sour cream. The tanginess also helps the cake rise slightly, as the acid reacts with the baking powder. This subtle interaction is what makes the crumb so tender and airy.
The Final Flourish
Vanilla extract enhances the overall flavor by adding depth and complexity. It brings out the sweetness of the cherries and the richness of the butter. Use a high‑quality vanilla extract for the best results, as cheaper options can taste medicinal. A pinch of ground cinnamon or nutmeg can be added for a warm, spiced note that complements the cherries. The vanilla also helps create a glossy, caramelized crust during baking. This final flourish ensures that every bite is a masterpiece of flavor and texture.
Everything's prepped? Good. Let's get into the real action.
The Method — Step by Step
- Preheat your oven to 350°F (175°C). Grease a 10‑inch bundt pan with butter and dust it lightly with flour, tapping out the excess. This ensures the cake slides out easily. I always use a silicone ring to keep the edges smooth. The pan should be at room temperature to prevent the batter from cooling too quickly. While the pan heats, I set the timer to 30 minutes to keep track of baking time.
- In a large mixing bowl, sift together 2 cups of all‑purpose flour, 1 tablespoon of baking powder, and a pinch of salt. Sifting removes lumps and aerates the flour, which is critical for a light crumb. I fold the dry ingredients together with a whisk to ensure even distribution. This step also helps the baking powder activate properly. The mixture should look fine and uniform, like freshly sifted flour.
- In another bowl, cream 3/4 cup of unsalted butter with 1 cup of granulated sugar until the mixture is pale and fluffy. Use an electric mixer on medium speed for 3 minutes. The goal is to incorporate air into the butter, which helps the cake rise. The mixture should look light and slightly glossy. This is the moment where the batter starts to feel like a cloud. Keep the mixer running until the sugar is fully dissolved.
- Beat in 3 large eggs, one at a time, ensuring each egg is fully incorporated before adding the next. The batter should thicken slightly with each addition. I always add a splash of vanilla extract at this point for aroma. The mixture should be smooth and glossy, with no streaks of egg. This step locks in the moisture and structure of the cake. A good indicator is when the mixture turns a light golden color.
- Stir in 1 cup of sour cream, 1 teaspoon of vanilla extract, and 2 tablespoons of freshly grated lemon zest. Mix until just combined, being careful not to overmix. The lemon zest adds brightness that cuts through the sweetness. The sour cream keeps the crumb moist and tender. The mixture should have a silky texture with no lumps. The aroma will be a hint of citrus and vanilla. This is the moment your kitchen smells like a summer orchard.
- Gently fold in 1 cup of fresh or thawed frozen cherries, reserving a handful for the topping. The cherries should be evenly distributed without breaking them into pieces. The batter will look speckled with bright red dots. This step adds flavor and visual appeal. The cherries also contribute to the cake’s moisture, so handle them gently. The result is a batter that looks like a canvas of fruit.
- Pour the batter into the prepared bundt pan, smoothing the top with a spatula. Tap the pan lightly on the counter to release any air bubbles. The batter should fill the pan to about 3/4 full. If you overfill, the cake may overflow during baking. The batter should look even and glossy on the top. This ensures a uniform rise.
- Bake for 30 minutes, then check the cake with a toothpick. If it comes out clean, the cake is done. If there’s batter sticking, bake for an additional 3–5 minutes. The cake should have a golden brown crust and a slight domed top. The edges should pull away from the pan. Once done, remove the cake from the oven and let it cool in the pan for 10 minutes. Then turn it out onto a wire rack to cool completely.
That’s it — you did it. But hold on, I’ve got a few more tricks that will take this to another level. These subtle adjustments can elevate the flavor, texture, and overall experience of your cherry bundt.
Insider Tricks for Flawless Results
The Temperature Rule Nobody Follows
Many bakers bake at 350°F, but the secret to a perfectly golden crust is to start at 375°F for the first 10 minutes, then reduce to 350°F for the remaining time. This high initial temperature creates a caramelized exterior while preserving a moist interior. The trick is to preheat the oven for at least 15 minutes before placing the pan inside. I’ve tried this method on several cakes, and the results are consistently superior. The crust develops a beautiful, slightly crisp texture that holds the cherries in place. This subtle temperature tweak is a game‑changer for any bundt enthusiast.
Why Your Nose Knows Best
When baking, you can gauge doneness by aroma rather than a toothpick alone. A warm, buttery scent that’s slightly sweet and citrusy signals that the cake is ready. The scent of caramelized sugar and vanilla is a clear indicator that the crust is set. If the aroma is more like raw batter, it needs a few more minutes. Trust your nose; it’s a reliable and often more intuitive indicator than visual cues alone. This trick saves time and reduces the risk of overbaking.
The 5‑Minute Rest That Changes Everything
After removing the cake from the oven, let it rest in the pan for exactly 5 minutes before turning it out. This short rest allows the cake to set, preventing cracks and ensuring a smooth surface. The heat inside the cake continues to cook slightly, sealing the edges. When you lift it, the cake will feel firm but still moist. A quick 5‑minute rest also makes slicing easier, as the crumb won’t crumble. This simple step is often overlooked but makes a significant difference.
Adding a Splash of Liquor for Depth
For a subtle adult twist, add 1 tablespoon of cherry brandy or cognac to the batter. The alcohol evaporates during baking, leaving a deeper, richer cherry flavor. It also adds a slight warmth that complements the vanilla. I’ve used this trick for holiday parties, and guests always ask for the recipe. The addition is small, but the impact is large, giving the cake a sophisticated edge.
Using a Silicone Ring for a Flawless Finish
Silicone rings are flexible, non‑stick, and easy to clean. They allow the cake to rise evenly and make removal painless. I use a silicone ring for all my bundts, as it eliminates the risk of cracking the crust. The ring also gives the cake a sleek, professional look. When you remove the cake, the ring leaves a perfect ring shape with no uneven edges. It’s a small investment that pays off in every bake.
Creative Twists and Variations
This recipe is a playground. Here are some of my favorite ways to switch things up:
Chocolate Cherry Bundt
Swap half the flour for cocoa powder and add 1/2 cup of dark chocolate chips. The chocolate adds richness and pairs beautifully with the cherry flavor. Use a high‑quality dark chocolate for depth. The result is a chocolate‑cherry bundt that feels indulgent yet balanced.
Almond Crunch Bundt
Fold in 1 cup of toasted almond slivers for a nutty crunch. The almonds add texture and a subtle nutty aroma. Use whole almonds if you prefer a stronger crunch. This variation is perfect for those who love a bit of bite in every bite.
Orange‑Rose Bundt
Replace the lemon zest with orange zest and add a teaspoon of rose water. The rose water gives a floral note that complements the orange’s brightness. Use a small amount, as rose water can be overpowering. This version is ideal for spring or summer gatherings.
Low‑Sugar Cherry Bundt
Reduce the sugar to 3/4 cup and add a tablespoon of stevia or monk fruit sweetener. The cake still stays moist and flavorful. The lower sugar content makes it a healthier option for those watching their intake. The cherry flavor remains dominant, so it’s still a treat.
Cheesecake‑Style Bundt
Add 1 cup of cream cheese to the batter for a cheesecake twist. The cream cheese adds a tangy, creamy texture that pairs well with cherries. Use low‑fat cream cheese for a lighter version. The result is a bundt that feels like a slice of cheesecake.
Storing and Bringing It Back to Life
Fridge Storage
Cool the bundt completely on a wire rack before wrapping it in plastic wrap. Store it in the refrigerator for up to 3 days. The cold keeps the cherries fresh and prevents the cake from drying out. When you’re ready to eat, let it sit at room temperature for 15 minutes to regain its soft crumb. If the cake feels dry, sprinkle a tiny splash of water over it before reheating.
Freezer Friendly
Wrap the cooled bundt tightly in plastic wrap, then place it in a freezer bag. It will stay fresh for up to 1 month. When you’re ready to enjoy, let it thaw in the refrigerator overnight. The texture remains moist, and the cherries keep their juiciness. The cake can be reheated in a low oven if desired.
Best Reheating Method
Preheat your oven to 300°F (150°C). Place the bundt on a baking sheet and cover it loosely with foil. Warm it for 10–12 minutes, or until heated through. The low temperature prevents the cake from drying out. If you prefer a crispier crust, remove the foil for the last 2 minutes. This method preserves the cake’s moisture while giving it a fresh, warm bite.