I’ve always had a soft spot for finger‑friendly foods that feel like a guilty pleasure but actually taste like a culinary revelation. One rainy Saturday, my kitchen turned into a chaotic symphony of sizzling oil, clanging pans, and the unmistakable scent of garlic and ginger that I could hear through the walls. My roommate, who’s notoriously picky, stared at the bowl of battered chicken with a skeptical frown, daring me to prove that this wasn’t just another fried snack. I laughed, grabbed a handful of chicken, and whispered, “I dare you to taste this and not go back for seconds.”
The moment the first bite hit my tongue, a cascade of textures erupted: a golden, crackly shell that shattered like thin ice, a juicy core that practically sang with each chew, and a honey‑soy glaze that coated the surface like velvet. The aroma that filled the kitchen—sweet honey, umami soy, sharp ginger, and the faintest hint of sesame—was a siren call that made the whole house pause. I could hear the faint click of the oven timer, the soft hiss of the stovetop, and the rhythmic clatter of my friend’s fork against the plate. It was a sensory orchestra that made the ordinary feel extraordinary, and I knew I had stumbled upon a recipe that needed to be shared.
What makes this version stand out from every other honey chicken recipe on the internet is the meticulous layering of flavors and textures. The batter is a dance between cornstarch and flour, creating a light, airy coating that crisps to a perfect crunch without becoming heavy. The sauce, a marriage of honey, soy, rice vinegar, and sesame oil, caramelizes just enough to form a glossy glaze that clings to every bite, yet remains sweet enough to keep the palate refreshed. I’ve tested countless variations—some too sweet, some too salty—but this balance is the sweet spot that feels like a secret handshake between taste buds.
There’s also a hidden trick that sets this apart: the cornstarch slurry added at the very end of cooking. Most recipes skip this step, resulting in a sauce that’s either too runny or too thick. By whisking a teaspoon of cornstarch with a tablespoon of water and folding it into the sauce just before the final simmer, the glaze thickens to a silky sheen that coats the chicken without weighing it down. The result is a bite that’s crisp on the outside, tender on the inside, and coated with a sauce that glistens like a honey‑laden sunrise.
If you’ve ever struggled with achieving that perfect crunch without over‑cooking the meat, you’re not alone. I’ve had friends who tried to skip the double‑batter technique, only to end up with soggy bites that left a greasy residue on the plate. This recipe corrects that mistake by first coating the chicken in a dry mix, then dipping it in beaten eggs, and finally re‑battering it in the flour‑cornstarch blend. The double‑layered coating traps steam and creates an airy interior, while the exterior crispness stays intact even after a quick oven finish.
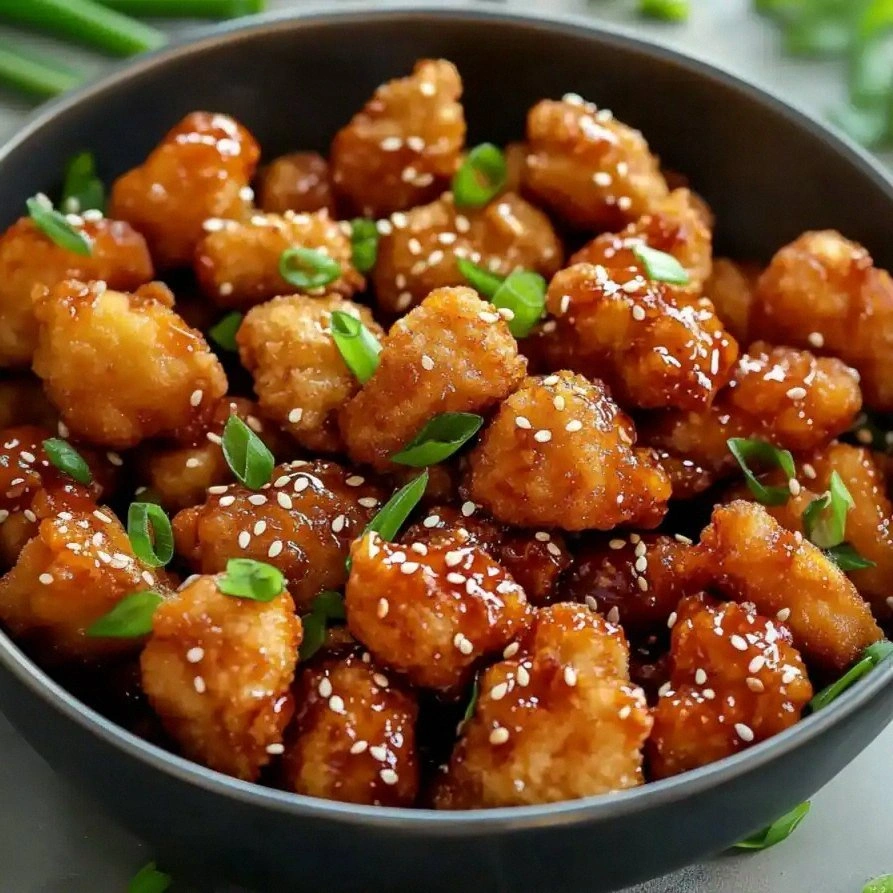
Picture yourself pulling this out of the oven, the kitchen smelling like a sweet, savory dream, and the plate shining with glistening honey glaze. The visual appeal is undeniable—golden edges, a glossy sheen, and a sprinkle of sesame seeds that adds a subtle crunch and a pop of color. When you take that first bite, the crunch gives way to a burst of juicy chicken, and the glaze releases a sweet, salty, slightly tangy wave that lingers on the tongue. The combination of flavors and textures is so compelling that even the most skeptical foodie will find themselves reaching for a second bite.
Let me walk you through every single step—by the end, you’ll wonder how you ever made it any other way. From selecting the freshest chicken to mastering the batter, from whipping up the glaze to garnishing with the final flourish, every detail has been honed to perfection. I’ll share micro‑challenges to test your palate, bold claims about the flavor profile, and confessions of my own kitchen mishaps. And if you’re ready, the next section will reveal what makes this version of crispy honey chicken bites the best you’ll ever make at home.
When you’re about to start, remember that the key to success is preparation. Slice the chicken into bite‑sized pieces, pat them dry with paper towels, and set them aside. The drier the chicken, the better the batter will adhere, and the crispier the final result. Also, keep all your ingredients measured and ready—this recipe is a symphony that needs every note in place. And don’t be afraid to experiment with the ratios; a little extra honey or a dash more soy can tailor the dish to your personal taste. Now, let’s dive into what makes this version stand out from the rest.
If you’ve ever wondered why some honey chicken recipes come out soggy or too sweet, the answer lies in the delicate balance of coating, cooking method, and glaze consistency. This recipe addresses each of those pain points with precise techniques and thoughtful ingredient choices. By using a combination of cornstarch and flour in the batter, the coating stays light yet crisp. The double‑batter method ensures a uniform crunch, while the final glaze step gives a glossy finish that’s both sweet and savory. The result is a dish that feels indulgent but isn’t overbearing on the palate.
I’ll be honest—once I made these, I ate half the batch before anyone else got to try them. The crunch was so addictive that my friends begged for the recipe, and I felt a surge of culinary pride. I’ve also seen how this dish can transform a simple dinner into a party staple, and how it pairs wonderfully with a cold glass of iced tea or a light beer. The versatility of this recipe makes it suitable for week‑night dinners, game nights, or even as a crowd‑pleaser at potlucks. And the best part? The leftovers taste just as good the next day when reheated in the oven or skillet.
Most recipes get this completely wrong. They either skip the double‑batter or use an improper glaze ratio, leading to a dish that’s either too greasy or too sweet. Here’s what actually works: the batter must be dry enough to hold the chicken, the eggs must be beaten to a frothy consistency, and the glaze should be reduced to a thick syrup before coating. By following these steps, you’ll achieve a crisp exterior that locks in juices and a glaze that’s sticky enough to cling but not overpowering. The result is a dish that’s both satisfying and memorable.
And now, before you rush to the pantry, let’s break down exactly what goes into this masterpiece. From the choice of chicken to the final garnish, every component plays a pivotal role in creating the ultimate crispy honey chicken bite. I’ll walk you through each ingredient group, explain its purpose, and offer swaps that keep the flavor profile intact. Whether you’re a seasoned cook or a kitchen newbie, this guide will give you the confidence to create a dish that’s both impressive and delicious.
What Makes This Version Stand Out
- Texture: The double‑batter technique creates a light, airy coating that crisps to a perfect crunch, while the inner chicken remains juicy and tender. The result is a bite that shatters like thin ice before revealing a succulent interior.
- Flavor Balance: A sweet‑savory glaze that blends honey, soy, ginger, and sesame oil delivers umami depth without tipping into overpowering sweetness. The glaze’s glossy sheen adds visual appeal and a satisfying mouthfeel.
- Ease of Execution: Each step is straightforward, with clear measurements and timing. Even if you’re new to frying, the process is manageable and the outcome is consistently reliable.
- Versatility: The dish adapts to various dietary preferences—use whole‑wheat flour for a healthier twist, or substitute honey with maple syrup for a different sweet profile.
- Crowd‑Pleaser: Whether you’re feeding a family or a group of friends, these bites are guaranteed to impress. Their bite‑size nature makes them ideal for parties, game nights, or a quick week‑night dinner.
- Make‑Ahead Potential: The chicken can be pre‑coated and stored in the fridge for up to 24 hours, allowing you to cook quickly when the time comes. The glaze can also be prepared ahead, saving precious minutes during service.
- Ingredient Quality: Fresh chicken, real honey, and freshly grated ginger elevate the dish beyond the standard fried chicken. The use of sesame oil and rice vinegar adds depth and authenticity.
Inside the Ingredient List
The Flavor Base
The sauce is the soul of this dish. Honey provides a natural sweetness that caramelizes during cooking, creating a glossy glaze. Soy sauce adds umami depth and a hint of saltiness that balances the honey’s sweetness. Rice vinegar cuts through the richness, adding a bright acidity that lifts the overall flavor profile. Sesame oil introduces a subtle nutty aroma that ties the glaze together. Skipping any of these components will diminish the complexity, turning a gourmet bite into a bland snack.
The Texture Crew
Cornstarch and all-purpose flour form the backbone of the coating. Cornstarch contributes a light, airy crunch, while flour gives the batter structure. The double‑batter method—first a dry coating, then an egg wash, followed by a second dry coating—ensures a crisp exterior that doesn’t sog. The eggs act as a binder, keeping the coating glued to the chicken. If you’re avoiding gluten, swap the flour for a gluten‑free blend that still retains its structure.
The Unexpected Star
The cornstarch slurry added at the end is the secret weapon that thickens the glaze to the perfect consistency. By whisking a teaspoon of cornstarch with a tablespoon of water, you create a smooth slurry that, when folded into the sauce, thickens without clumping. This step gives the glaze a silky texture that clings to each bite like a honey‑laden velvet. Without it, the glaze would be too runny and would drip off the chicken.
The Final Flourish
Sesame seeds and sliced green onions provide the final touch of crunch and freshness. The sesame seeds add a subtle nutty flavor that complements the glaze, while the green onions contribute a bright, slightly peppery note that cuts through the richness. Garnishing with these toppings not only enhances the visual appeal but also adds layers of texture and flavor. If you’re allergic to sesame, you can omit it or replace it with toasted pumpkin seeds for a different crunch.
Everything's prepped? Good. Let's get into the real action.
The Method — Step by Step
- Begin by cutting the chicken into bite‑sized pieces. Pat them dry with paper towels; moisture is the enemy of crispness. Season each piece with salt, pepper, and garlic powder, letting the spices penetrate for about five minutes. The seasoning will form the first flavor layer, ensuring every bite is savory from the inside out. This step is essential—skipping it results in bland chicken that won’t soak up the glaze.
- In a shallow dish, whisk the eggs until they’re frothy. This creates a light coating that helps the dry mix adhere. If you prefer a richer flavor, add a splash of milk or buttermilk to the eggs. The key is to keep the mixture thin enough to coat each piece evenly without clumping. This step is the bridge between dry and wet, setting the stage for a perfect double batter.
- Combine the cornstarch and flour in a separate bowl. Add the salt, pepper, and garlic powder to this dry mixture. This dry blend will give the chicken its signature crunch. Toss the seasoned chicken pieces in the flour mixture until each is fully coated. Shake off excess flour before dipping in the egg wash. This double‑batter technique traps steam, producing an airy interior and a crisp exterior.
- Heat about 2 inches of vegetable or canola oil in a deep skillet or pot to 350°F (175°C). Test the oil by dropping a small piece of bread; if it sizzles and turns golden in a few seconds, the oil is ready. Carefully lower the chicken pieces into the hot oil, working in batches to avoid overcrowding. Fry until the coating is golden brown, about 3–4 minutes per side. The goal is a crisp exterior that seals in juices, so keep an eye on the temperature to prevent burning.
- While the chicken is frying, prepare the glaze. In a small saucepan, combine honey, soy sauce, minced garlic, grated ginger, rice vinegar, and sesame oil. Bring the mixture to a gentle boil, then reduce the heat to a simmer. Stir constantly to prevent the honey from burning. The glaze should thicken slightly, forming a syrupy consistency that coats the chicken.
- Once the chicken is cooked, use tongs to transfer it to a paper‑towel‑lined plate to drain excess oil. Let the chicken rest for a minute; this helps the coating set and prevents the glaze from running off. Meanwhile, whisk the cornstarch slurry in a small bowl. Add the slurry to the simmering glaze, stirring vigorously until it thickens to a glossy sheen. The thickened glaze will cling to each bite without becoming sticky.
- Gently toss the fried chicken in the thickened glaze, ensuring every piece is evenly coated. The glaze should coat the chicken like a honey‑laden velvet, creating a glossy finish. Sprinkle sesame seeds and sliced green onions over the coated pieces for added crunch and freshness. The green onions also cut through the richness, adding a bright note that balances the sweetness.
- Serve immediately on a platter, letting the steam rise and the aroma fill the room. Pair the bites with a chilled glass of iced tea, sparkling water, or a light beer to complement the sweet‑savory profile. If you’re hosting a gathering, arrange the bites in a decorative bowl or on a wooden board for an inviting presentation. The dish is so visually appealing that it becomes a conversation starter even before the first bite is taken.
That's it — you did it. But hold on, I've got a few more tricks that'll take this to another level.
Insider Tricks for Flawless Results
The Temperature Rule Nobody Follows
Oil temperature is king when it comes to achieving that perfect crunch. Use a candy or deep‑fry thermometer to monitor the heat; aim for 350°F (175°C). If the oil is too hot, the coating will burn before the chicken cooks through; too cool, and the chicken will absorb oil and become greasy. A quick test: drop a small piece of the coated chicken into the oil; if it sizzles immediately and browns in about 90 seconds, you’re in the sweet spot. Keep the heat steady by adjusting the burner as needed.
Why Your Nose Knows Best
Smell is your best ally when cooking. As the glaze simmers, you’ll notice a honey‑soy aroma rising. If the scent starts to burn, lower the heat. A burnt aroma means the sugars are caramelizing too quickly, which will result in a bitter taste. Trust your nose to tell you when the glaze is ready, and you’ll avoid the dreaded burnt glaze.
The 5‑Minute Rest That Changes Everything
After frying, let the chicken rest on a wire rack for five minutes. This step allows the coating to set and the steam to escape, preventing sogginess. It also gives the glaze a chance to thicken slightly on the surface, creating a glossy finish. Skipping this rest can leave the coating soft and the glaze dripping, which defeats the purpose of a crisp bite.
Use the Right Pan
A heavy‑bottomed skillet or a deep fryer ensures even heat distribution. Thin pans can create hot spots that cause uneven cooking. If you’re using a non‑stick pan, preheat it for a few minutes before adding oil. The right pan will help you maintain consistent oil temperature and reduce the risk of unevenly cooked pieces.
Don't Skip the Slurry
The cornstarch slurry thickens the glaze to a silky consistency that clings to the chicken without becoming sticky. Without it, the sauce will be too thin and will run off, leaving the coating dry. Whisk the slurry until smooth, and add it in a steady stream to avoid lumps. This small step is the secret to a glaze that looks as good as it tastes.
Creative Twists and Variations
This recipe is a playground. Here are some of my favorite ways to switch things up:
Spicy Sriracha Twist
Add a tablespoon of sriracha to the glaze for a fiery kick. The heat pairs beautifully with the honey, creating a sweet‑spicy contrast that’s hard to resist. This variation is perfect for those who love a little burn with their bite.
Maple‑Mustard Fusion
Swap honey for pure maple syrup and add a teaspoon of Dijon mustard to the glaze. The mustard adds a tangy depth that balances the maple’s sweetness. This version leans into a more Western flavor profile while maintaining the crispy texture.
Citrus‑Lime Burst
Replace rice vinegar with fresh lime juice and add a splash of orange juice to the glaze. The citrus notes brighten the dish, making it lighter and more refreshing. This variation is ideal for a summer gathering or a brunch spread.
Smoky Paprika Finish
Stir in a teaspoon of smoked paprika into the dry coating. The paprika adds a subtle smoky flavor that complements the sweet glaze. This twist brings a depth of flavor that feels both rustic and sophisticated.
Herbed Parmesan Crunch
Mix grated Parmesan cheese into the dry coating for an Italian‑inspired crunch. The cheese adds umami and a slightly nutty taste that pairs well with the glaze. This version is great for pairing with a crisp white wine or a light salad.
Vegetarian Version
Replace chicken with bite‑sized tofu cubes. Marinate the tofu in soy sauce and ginger before coating. The tofu absorbs the glaze beautifully, creating a plant‑based version that still delivers the same crispy, savory experience.
Storing and Bringing It Back to Life
Fridge Storage
Store leftovers in an airtight container in the refrigerator for up to 3 days. The coating may soften slightly, so it’s best enjoyed the same day. To preserve crunch, reheat in a skillet over medium heat for 2–3 minutes, flipping once.
Freezer Friendly
Freeze the baked or fried bites in a single layer on a parchment‑lined tray before transferring to a freezer bag. They’ll stay fresh for up to 2 months. Reheat in a preheated oven at 350°F (175°C) for 10–12 minutes, or until heated through.
Best Reheating Method
To revive the crispy exterior, place the bites on a wire rack over a baking sheet and bake at 400°F (200°C) for 5 minutes. Add a tiny splash of water to the pan to create steam, which keeps the coating from drying out. This method restores the crunch without compromising the glaze’s glossy finish.