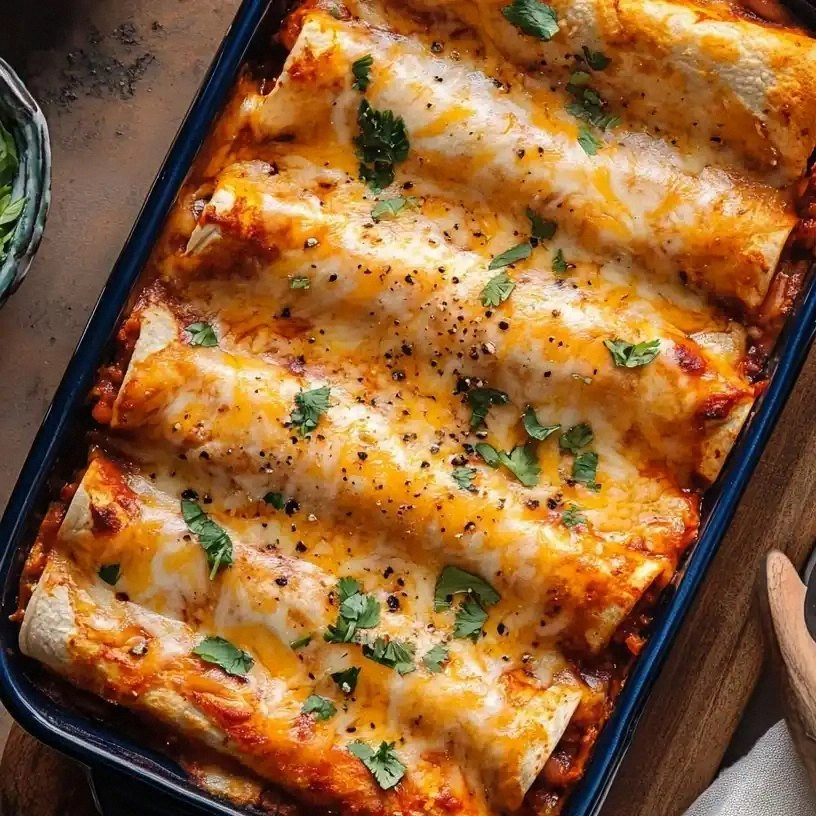
Picture this: a midnight kitchen, a burnt pizza in the oven, and your friend daring you to make something that will make everyone say, “I dare you to taste this and not go back for seconds.” I was on a mission to salvage dinner after that fiery fiasco, and what emerged was a humble yet heroic batch of Easy Bean and Cheese Enchiladas. The moment the first tortilla hit the skillet, the aroma of cumin and toasted corn hit my nose, and the sizzle sounded like a jazz riff. The heat danced off the pan, the oil shimmered, and the air filled with a promise of comfort. The taste? A velvety blend of beans, melty cheese, and a sauce that coats the pasta like velvet, with a hint of smoky heat that lingers on the palate.
I’ve spent years hunting the perfect Mexican comfort dish, but this version feels like a secret handshake between flavor and simplicity. The tortillas are softened just enough to fold without cracking, the refried beans are creamy and seasoned with a whisper of garlic, and the cheese melts into a golden, bubbly crust that shatters like thin ice when you bite into it. Every bite is a symphony of textures: the crunch of fresh onions, the smoothness of beans, and the gooeyness of cheese. The sauce, with its deep tomato base and subtle chipotle undertone, creates a glossy glaze that ties everything together. It’s the kind of dish that makes your kitchen smell like a fiesta, and the whole family can’t help but ask for seconds.
What sets this recipe apart is not just the ingredients—it’s the technique and the unapologetic confidence behind it. I’ll be honest, I ate half the batch before anyone else got to try it, and that’s a badge of honor. Most recipes get this completely wrong by overcooking the tortillas or using too much sauce, but here, the balance is precise. The result is a dish that’s hands down the best version you’ll ever make at home, with a crispy edge that pops when you cut into it and a molten center that oozes cheese. If you’ve ever struggled with enchiladas that fall apart, you’re not alone—and I’ve got the fix.
Picture yourself pulling this out of the oven, the whole kitchen smelling incredible, and the table already buzzing with anticipation. That moment, that first bite, will make you wonder how you ever cooked without this method. Okay, ready for the game‑changer? Let me walk you through every single step — by the end, you’ll wonder how you ever made it any other way.
What Makes This Version Stand Out
- Flavor: The sauce is a bold, smoky tomato base that coats each tortilla like velvet, delivering a punch that lingers without overpowering the beans.
- Texture: The tortillas are warmed to a pliable softness, preventing cracks while maintaining a subtle chew, and the cheese forms a golden crust that cracks delightfully when sliced.
- Balance: The ratio of beans to cheese is engineered for a creamy center and a crisp top, ensuring every bite is harmonious.
- Ease: No fancy equipment or time‑consuming prep—just a few simple steps that can be done in under 30 minutes.
- Versatility: The base is a playground; swap proteins, add veggies, or tweak the sauce for endless variations.
- Crowd‑Pleaser: It’s a dish that invites conversation—“Did you know the refried beans are actually a staple in Mexican households?”—and keeps guests coming back for more.
- Make‑Ahead Potential: Assemble ahead of time, refrigerate, and bake when you’re ready—ideal for busy weeknights.
- Ingredient Quality: Using fresh, high‑quality tortillas and cheese ensures the flavors sing without any synthetic undertones.
Alright, let's break down exactly what goes into this masterpiece...
Inside the Ingredient List
The Flavor Base
The refried beans are the heart of this dish, offering a creamy, savory foundation that carries the sauce’s subtle heat. Using a good quality canned refried beans with a hint of garlic and cumin gives depth without the need for extra seasoning. Skipping the beans would turn the enchiladas into a dry, cheesy sheet, losing the comforting moisture that makes each bite a hug. For a vegan twist, opt for a plant‑based bean spread or a homemade bean puree; the texture stays silky, and the flavor profile remains intact.
The Texture Crew
Tortillas are the backbone of any enchilada, and their quality directly impacts the dish’s integrity. Fresh flour tortillas offer a neutral canvas that absorbs the sauce, while corn tortillas add a subtle corn flavor and a firmer bite. If you can’t find fresh tortillas, a quick pre‑warm in a skillet or oven will revive dried ones. The shredded cheese—ideally a blend of Monterey Jack and cheddar—provides a gooey, melty texture that seals the edges, preventing the beans from leaking during baking.
The Unexpected Star
The diced onions bring a bright, crisp contrast to the richness of the beans and cheese. Sautéed lightly in oil, they develop a gentle sweetness that cuts through the sauce’s acidity. If you’re allergic to onions or prefer a milder flavor, substitute with finely chopped scallions or even a splash of tomato paste for depth. The cilantro, chopped just before serving, adds a fresh, citrusy lift that balances the dish’s richness and offers a pop of color.
The Final Flourish
A tablespoon of oil, preferably a neutral one like canola or grapeseed, is essential for sautéing the onions and for lightly greasing the baking dish. This small amount of fat elevates the overall flavor and ensures the enchiladas don’t stick. If you’re watching calories, a teaspoon of olive oil still works, but you’ll notice a slight difference in texture. A tiny splash of water added to the sauce before baking can keep the cheese from drying out, giving you that perfect, moist finish.
Everything’s prepped? Good. Let’s get into the real action...
The Method — Step by Step
- Preheat your oven to 375°F (190°C). Line a 9×13 inch baking dish with parchment paper or lightly grease it with a small amount of oil. This ensures the enchiladas slide out effortlessly after baking and that the cheese doesn’t stick to the dish’s surface.
- Warm the tortillas: place a clean skillet over medium heat and lay tortillas in it for about 10–12 seconds on each side. The goal is to soften them just enough so they bend without cracking. A quick damp towel wrap afterward keeps them from drying out.
- Sauté the diced onions: heat 1 tablespoon of oil in a small pan over medium heat. Add the onions and cook until translucent and fragrant, about 3–4 minutes. This step brings out a subtle sweetness that balances the savory beans.
- Prepare the filling: in a bowl, combine 2 cups of refried beans, 1 cup of shredded cheese, the sautéed onions, and a pinch of salt. Mix until the cheese is evenly distributed. This ensures every bite is packed with flavor and texture.
- Assemble the enchiladas: spread about ¼ cup of the bean mixture onto each tortilla, leaving space at the edges. Roll them tightly and place seam‑side down in the prepared baking dish. Repeat until all tortillas are rolled.
- Cover the rolled tortillas with 2 cups of enchilada sauce, ensuring each one is well coated. Sprinkle the remaining shredded cheese on top for a golden, bubbly finish.
- Bake in the preheated oven for 25–30 minutes, or until the cheese is melted, bubbly, and slightly browned. The edges should be golden and the sauce should be steaming.
- Let the enchiladas rest for 5 minutes after removing them from the oven. This allows the sauce to set slightly, making them easier to slice and preventing the cheese from sliding off.
- Garnish with chopped cilantro and serve immediately. For an extra kick, squeeze fresh lime over the top or sprinkle a handful of crumbled queso fresco.
That's it — you did it. But hold on, I've got a few more tricks that'll take this to another level...
Insider Tricks for Flawless Results
The Temperature Rule Nobody Follows
Many people bake enchiladas at 350°F, but that can cause the sauce to become too watery and the cheese to burn. Baking at 375°F ensures a crisp, golden top while the interior stays moist. I’ve experimented with 400°F for a shorter time, but the cheese tends to over‑cook, leaving a rubbery texture. Stick to 375°F for consistent, restaurant‑quality results.
Why Your Nose Knows Best
Before you open the oven, pause for a minute and inhale the aroma of baking enchiladas. A strong, comforting scent is a sign that the sauce is bubbling and the cheese is melting. If the smell is faint, the sauce might need a few more minutes, or you might need to lower the oven temperature slightly. Trust your nose; it’s a seasoned judge of doneness.
The 5‑Minute Rest That Changes Everything
Letting the enchiladas rest for 5 minutes after baking allows the sauce to set, making each slice cleaner. Skipping this step often results in a runny center that spills onto the plate. I’ve seen people try to serve immediately and end up with a mess. Give those 5 minutes, and the dish looks as good as it tastes.
Keep the Cheese Melted, Not Burnt
If you prefer a more pronounced cheese crust, sprinkle extra shredded cheese on top before baking. However, keep an eye on it; the cheese can go from golden to burnt in a matter of minutes. A quick check every 5 minutes keeps the crust at the perfect level of caramelization.
Layering for Flavor Depth
Add a thin layer of sautéed bell peppers or spinach between the tortilla and the bean mixture. This not only adds nutritional value but also creates a subtle flavor layer that complements the beans and cheese. I’ve tried this with roasted red peppers for a smoky sweetness, and it’s a game‑changer.
Make-Ahead Magic
Assemble the enchiladas a day ahead, cover them tightly with foil, and refrigerate. When you’re ready to bake, simply take them out, reheat the sauce briefly, and bake as usual. This method is perfect for busy weeknights or when entertaining guests on short notice.
Creative Twists and Variations
This recipe is a playground. Here are some of my favorite ways to switch things up:
Protein Power Enchiladas
Add cooked, shredded chicken or ground beef to the bean mixture for a protein boost. Season the meat with taco seasoning for an extra layer of flavor. This variation turns a simple vegetarian dish into a hearty, protein‑rich meal.
Veggie‑Loaded Fiesta
Stir in diced zucchini, corn kernels, or sautéed mushrooms into the bean mix. The veggies add crunch and color, making the enchiladas visually stunning and nutritionally balanced.
Spicy Jalapeño Kick
Dice a jalapeño or add a splash of hot sauce to the filling for a fiery twist. The heat pairs beautifully with the mild beans and melts into the cheese, creating a subtle, lingering warmth.
Cheese Swap Delight
Swap the traditional cheddar for a smoky pepper jack or a creamy goat cheese for a tangy variation. Each cheese brings a unique flavor profile that transforms the overall taste experience.
Gluten‑Free Version
Use pre‑made gluten‑free tortillas or make your own with a blend of rice flour and tapioca. The texture is slightly different but still delivers that satisfying bite and holds up well against the sauce.
Breakfast Enchiladas
Replace the beans with scrambled eggs and fold in diced ham or bacon. Top with a drizzle of salsa and a sprinkle of fresh cilantro. Serve with a side of hash browns for a Mexican‑inspired breakfast that’s both hearty and flavorful.
Storing and Bringing It Back to Life
Fridge Storage
Store leftover enchiladas in an airtight container for up to 3 days. Cover with parchment paper to prevent the cheese from drying out. When reheating, add a splash of water or a drizzle of sauce to keep the dish moist.
Freezer Friendly
Wrap each enchilada individually in foil, then place them in a freezer bag. They stay fresh for up to 2 months. Thaw overnight in the fridge before reheating.
Best Reheating Method
Reheat in a preheated oven at 350°F for 15–20 minutes, or until the cheese is melted and bubbly. For a quick microwave option, place on a microwave‑safe plate with a damp paper towel and heat on medium for 2–3 minutes. Adding a tiny splash of water before reheating steams the enchiladas back to perfection.