I still remember the first time I tried to grill chicken thighs that actually tasted like something you'd pay money for. It was a disaster. The outside was charred to oblivion, the inside was rubbery and pink, and the sauce? Let's just say it resembled something you'd find in a bad hotel buffet. My friends politely chewed, nodded, and secretly fed it to the dog. Fast forward through three months of obsessive testing, countless bottles of hot sauce, and one particularly memorable incident involving a fire extinguisher, and here we are. This recipe isn't just good — it's the kind of good that makes grown adults fight over the last piece. The kind that has neighbors showing up at your door with empty plates and hopeful expressions. The kind that'll ruin you for restaurant barbecue forever.
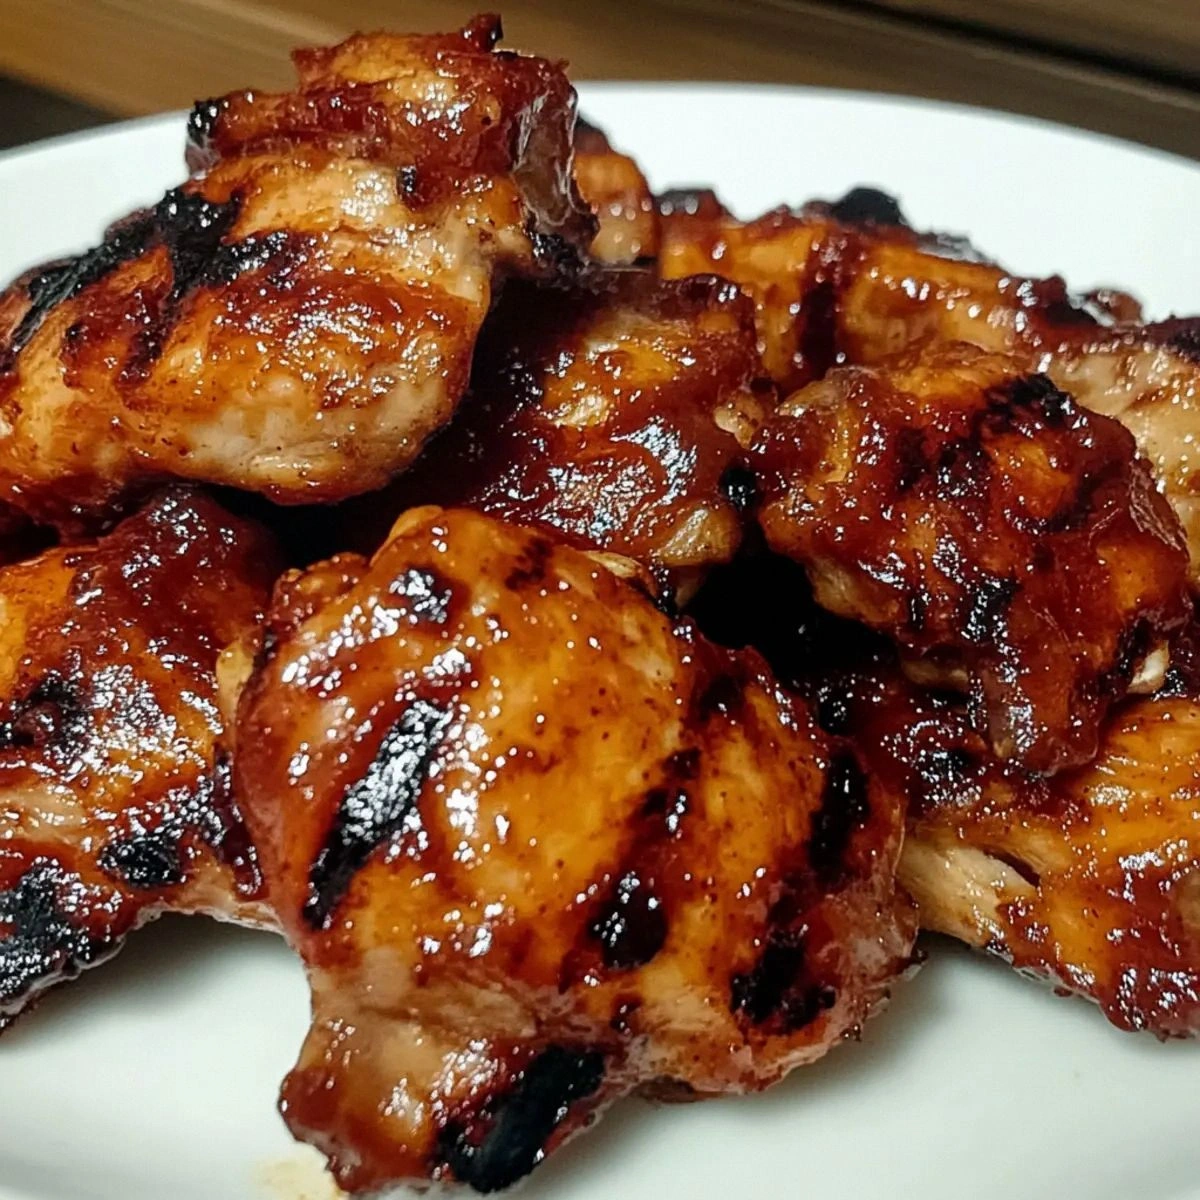
Picture this: It's Saturday afternoon, the sun's doing that golden-hour thing that makes everything look like a movie, and your grill is sending up wisps of smoke that smell like summer itself. You lift the lid and there they are — glossy, mahogany-skinned chicken thighs that glisten with this spicy-sweet glaze that's been building layers of flavor for hours. The edges are caramelized and just a little crispy, the kind of crispy that gives way to meat so juicy it practically sighs when you cut into it. Your neighbor walks by, stops mid-stride, and just stands there sniffing the air like a bloodhound. That's when you know you've got something special.
Here's the thing about most grilled chicken recipes — they treat the chicken like an afterthought, just some protein vehicle for whatever sauce you're dumping on top. But this? This is different. We're building flavor from the ground up, starting with a spice blend that wakes up your taste buds like a splash of cold water, then layering on a barbecue sauce that hits every note: sweet, tangy, spicy, smoky, with a complexity that makes you close your eyes and say "wow" out loud like some kind of food commercial cliché. And the best part? It's actually easier than whatever sad, dry chicken you've been making. No overnight marinating, no fancy equipment, no culinary degree required.
Let me walk you through every single step — by the end, you'll wonder how you ever made it any other way.
What Makes This Version Stand Out
Rebel Spice Blend: Forget that sad paprika-heavy rub that tastes like red dust. We're using a custom blend that includes smoked paprika, chipotle powder, and a secret ingredient that gives it this haunting depth you can't quite identify but can't stop eating. It's like the difference between elevator music and a symphony — same basic instruments, completely different experience.
The Two-Zone Method: Most people either blast their chicken with direct heat (hello, burnt outside, raw inside) or go low and slow (hello, rubbery skin). We're doing both — searing over screaming hot coals to get those gorgeous grill marks, then moving to indirect heat to finish cooking gently. The result? Skin that crackles like thin ice, meat that stays juicy as a ripe peach.
Sauce That Actually Sticks: You know how most barbecue sauces just slide right off chicken like it's wearing a nonstick jacket? Not this one. We reduce it until it coats the back of a spoon like velvet, then brush it on during the last few minutes so it caramelizes instead of burning. It becomes part of the chicken, not just something sitting on top.
Butter-Basted Brilliance: Here's where things get a little extra — we baste the chicken with garlic-herb butter during the last flip. The butter carries flavors into the meat, bastes the skin to golden perfection, and adds this richness that makes people close their eyes when they bite into it. It's not necessary, but neither is happiness — and you deserve both.
The Rest Period That Changes Everything: Most folks yank their chicken off the grill and immediately start hacking away like cavemen. We're going to let it rest for five minutes, during which something magical happens: the juices redistribute, the fibers relax, and the chicken becomes fork-tender instead of sawdust-dry. It's the difference between good and legendary.
Make-Ahead Magic: The sauce actually gets better after a day in the fridge, and the spice rub can be mixed in bulk and stored for months. You can prep everything on Sunday and have restaurant-quality chicken on a Tuesday night when you're too tired to cook but too proud to order takeout again. It's like having a culinary safety net.
Alright, let's break down exactly what goes into this masterpiece...
Inside the Ingredient List
The Flavor Foundation
Let's start with the chicken itself, because this is where most people go wrong. I'm begging you — use boneless, skinless thighs, not those sad little chicken breasts that taste like compressed sawdust. Thighs have more fat, more flavor, and they're basically impossible to overcook. They stay juicy and forgiving, unlike breasts that go from perfect to cardboard in thirty seconds flat. Four thighs feed four people, or two hungry teenagers, or one person who's had a really bad day and deserves to eat their feelings in peace.
The olive oil isn't just there to prevent sticking — it's carrying flavors into every crevice of the chicken like a tiny flavor taxi. Use the good stuff here, not that ancient bottle that's been sitting next to your stove since 2019. The fruitier, the better. Salt and pepper seem basic, but they matter more than you'd think. I use kosher salt because the bigger crystals grab onto the meat better, and freshly ground black pepper because the pre-ground stuff tastes like disappointment and regret.
The Aromatics Alliance
Butter might seem redundant when you're already using oil, but trust me on this one. It adds this nutty, rich flavor that oil alone can't achieve, plus it helps the sauce cling to the chicken like a delicious edible sweater. Use unsalted butter so you can control the salt level — nobody wants to feel like they just swallowed the Dead Sea.
The yellow onion is your flavor backbone, providing sweetness and depth that builds the sauce from the ground up. Dice it fine so it melts into the sauce rather than standing out like awkward chunks. Fresh garlic is non-negotiable — the powdered stuff tastes like a bad memory. Mince it fine so it distributes evenly and doesn't burn in the hot pan.
The Sauce Superstars
Ketchup might seem like cheating, but it's the perfect base for barbecue sauce — already thick, sweet, and tangy. Just promise me you'll use the real stuff, not some organic impostor made with dates and sadness. The paprika adds smoke and color, but not all paprika is created equal. Spanish smoked paprika gives you that campfire flavor even if you're cooking on a gas grill.
Here's where things get spicy — sriracha or sambal oelek bring the heat, but they also bring complexity. Sriracha is milder and slightly sweet, perfect for heat wimps. Sambal oelek is pure chili fire, for those who like to cry while they eat. Chili powder adds another layer of warmth without being overwhelming, like a cozy blanket for your taste buds.
Worcestershire sauce is the umami bomb that makes people say "what's in this?" with wonder in their eyes. It's got anchovies, tamarind, vinegar, and about twenty other ingredients that add depth you can't get any other way. Mustard provides tang and helps emulsify the sauce — use Dijon if you're fancy, yellow if you're not, but don't skip it entirely unless you want a sad, separated sauce.
Everything's prepped? Good. Let's get into the real action...
The Method — Step by Step
- Start by patting those chicken thighs dry with paper towels like you're giving them a little spa treatment. Moisture is the enemy of good browning — it's like trying to toast bread in a steam room. Season both sides generously with salt and pepper, really massage it in like you're giving the chicken a deep tissue massage. This isn't the time to be shy with seasoning — most of it will stay on the surface, so be bold. Let them sit while you prep everything else; even fifteen minutes makes a difference.
- Heat your olive oil in a heavy-bottomed pan over medium-high heat until it shimmers like a mirage on a hot highway. You want it hot enough that the chicken sizzles immediately when it hits the pan — that sizzle is the sound of flavor being born. Lay the thighs in gently, presentation side down first, and don't crowd them like they're on a packed subway car. Give them space to breathe and brown properly. If your pan's too small, work in batches — I know it's tempting to rush, but trust the process.
- While the chicken works its magic, start building your sauce in another pan. Melt the butter over medium heat until it foams and smells nutty — not browned, just fragrant like warm, buttery heaven. Add your diced onion and cook until it turns translucent and sweet, about five minutes. You're looking for that moment when the sharp raw onion smell transforms into something soft and caramelized. Stir occasionally, but not constantly — let it develop some color.
- Add the garlic to your onions and cook for just thirty seconds — garlic burns faster than a vampire in sunlight, so stay vigilant. You want it fragrant but not brown. Stir in the paprika, chili powder, and a pinch of salt, letting the spices toast in the butter for about a minute. They should smell toasty and amazing, like you're walking through a spice market. This step blooms the spices and removes any raw, dusty flavors.
- Pour in the apple cider vinegar and water, scraping up any browned bits from the bottom of the pan — they're flavor gold. Stir in the ketchup, sriracha, mustard, and Worcestershire sauce. Bring it to a gentle simmer and let it bubble away for about ten minutes, stirring occasionally. You're looking for it to thicken enough to coat the back of a spoon. If it's too thick, add water a tablespoon at a time. Too thin? Let it simmer longer.
- Back to your chicken — after about six minutes, check the underside. You're looking for deep golden brown with darker edges, like a perfectly toasted marshmallow. Flip them over and cook the other side for another four to five minutes. The second side cooks faster because the pan is hotter and the chicken's partially cooked through. Don't flip them more than once — patience is a virtue that pays off in crispy skin.
- Now comes the fun part — brush that glorious sauce onto the chicken. Be generous but not drowning — you want to coat, not drown. Let it cook for another two minutes, then flip and sauce the other side. The sauce will caramelize and get sticky, creating this glossy coating that makes people weak in the knees. If you're feeling extra, baste with some of that garlic-herb butter I mentioned earlier.
- Check for doneness by pressing on the thickest part — it should feel firm but not rock hard, or use a thermometer if you're fancy (165°F is your magic number). Remove to a plate and let rest for five minutes. I know you're hungry and it smells incredible, but resting is what separates good chicken from life-changing chicken. During this time, the juices redistribute and the meat relaxes into fork-tender perfection.
That's it — you did it. But hold on, I've got a few more tricks that'll take this to another level...
Insider Tricks for Flawless Results
The Temperature Rule Nobody Follows
Here's what separates the pros from the amateurs: take your chicken out of the fridge thirty minutes before cooking. Room-temperature chicken cooks more evenly, browns better, and stays juicier than cold chicken that hits a hot pan. I know, I know — you've heard this before. But are you doing it? Probably not. Cold chicken straight from the fridge is like trying to warm up a frozen steak — the outside overcooks while the inside plays catch-up. Set a timer, pour yourself a drink, and let those thighs relax on the counter. Trust me, food safety police — thirty minutes won't kill anyone, but dry chicken might.
Why Your Nose Knows Best
Your nose is actually the most sophisticated piece of cooking equipment you own. When the onions hit the pan, they should smell sweet and mellow, not sharp and eye-watering. When the garlic goes in, you should get this amazing aroma that makes you want to dive face-first into the pan. When the spices toast, your kitchen should smell like a Middle Eastern market. If something smells off or burnt, it probably is. Don't walk away during these crucial moments — stand there and sniff like a bloodhound. It's not weird, it's smart cooking.
The 5-Minute Rest That Changes Everything
I cannot stress this enough — let your chicken rest. Not two minutes, not three, but a full five minutes. During this time, something magical happens: the juices that have been driven to the center by heat start to redistribute throughout the meat. Cut too early and they all run out onto your cutting board, leaving you with dry chicken and a sad puddle of flavor. Cover loosely with foil and use this time to finish your sauce, set the table, or just stand there inhaling the incredible smells. When you finally cut into it, the juices should stay put, creating meat that's moist, tender, and absolutely perfect.
Creative Twists and Variations
This recipe is a playground. Here are some of my favorite ways to switch things up:
The Sweet Heat Version
Add two tablespoons of honey and a pinch of cinnamon to your sauce for a sweet-heat combo that'll make your taste buds dance. The honey helps the sauce caramelize even more, creating these sticky, almost candy-like edges that are completely addictive. Cut back on the sriracha by half if you're serving spice-sensitive folks — the honey amplifies the heat, so a little goes a long way. This version is incredible with grilled pineapple on the side.
The Smoky Bourbon Edition
Replace half the water with bourbon and add a teaspoon of liquid smoke for depth that tastes like you cooked this over a campfire. The alcohol cooks off, leaving behind this complex, smoky-sweet flavor that's absolutely restaurant-worthy. Use a good bourbon — if you wouldn't drink it, don't cook with it. This version pairs beautifully with grilled corn and coleslaw.
The Tropical Jerk Fusion
Add a tablespoon of jerk seasoning and replace the water with pineapple juice for a Caribbean twist that'll transport you straight to the islands. The sweetness of the pineapple balances the heat from the scotch bonnet peppers in the jerk seasoning. Throw some fresh thyme in with the onions and finish with a squeeze of lime. Serve with coconut rice and you'll swear you're on vacation.
The Asian-Inspired Glaze
Swap the ketchup for hoisin sauce, add a tablespoon of grated ginger, and finish with sesame seeds and scallions. The hoisin gives you this sweet-savory base that's incredibly addictive, while the ginger adds brightness and zing. Use rice vinegar instead of apple cider for a cleaner, more refined flavor. This version is amazing over steamed rice with quick-pickled vegetables.
Storing and Bringing It Back to Life
Fridge Storage
Store leftover chicken in an airtight container in the fridge for up to four days. Separate the chicken from any extra sauce — the sauce will keep longer, and you don't want everything turning into a soggy mess. Let everything cool completely before refrigerating, or you'll create condensation that makes everything watery. The chicken actually gets more flavorful as it sits, so day-two leftovers are often better than day-one fresh.
Freezer Friendly
This chicken freezes beautifully for up to three months. Wrap individual pieces tightly in plastic wrap, then in foil, and label with the date. Thaw overnight in the fridge, never on the counter — we're making delicious food here, not hosting a bacteria party. The sauce can be frozen separately in ice cube trays for perfect single-serving portions. Just pop out what you need and warm it up.
Best Reheating Method
Skip the microwave — it'll turn your beautiful chicken into shoe leather faster than you can say "leftovers." Instead, wrap the chicken in foil with a splash of water or chicken broth, and warm it in a 325°F oven for about fifteen minutes. The steam keeps everything moist while the foil prevents drying. For the sauce, warm it gently in a small pan with a tablespoon of water. Whatever you do, don't overheat — you're just warming it through, not cooking it again.