I was standing in my kitchen, half‑asleep, when my niece dared me to make “the most Instagram‑worthy candy apples ever.” I laughed, grabbed a bag of apples, and tried the usual store‑bought caramel coating. The result? A sticky, soggy mess that looked more like a science‑project gone wrong than a glossy sunset on a stick. I swear I heard the apples sigh in disappointment, and that’s when I decided enough was enough. This was the moment I vowed to create a candy‑apple experience that would make even the most seasoned carnival vendor weep with envy.
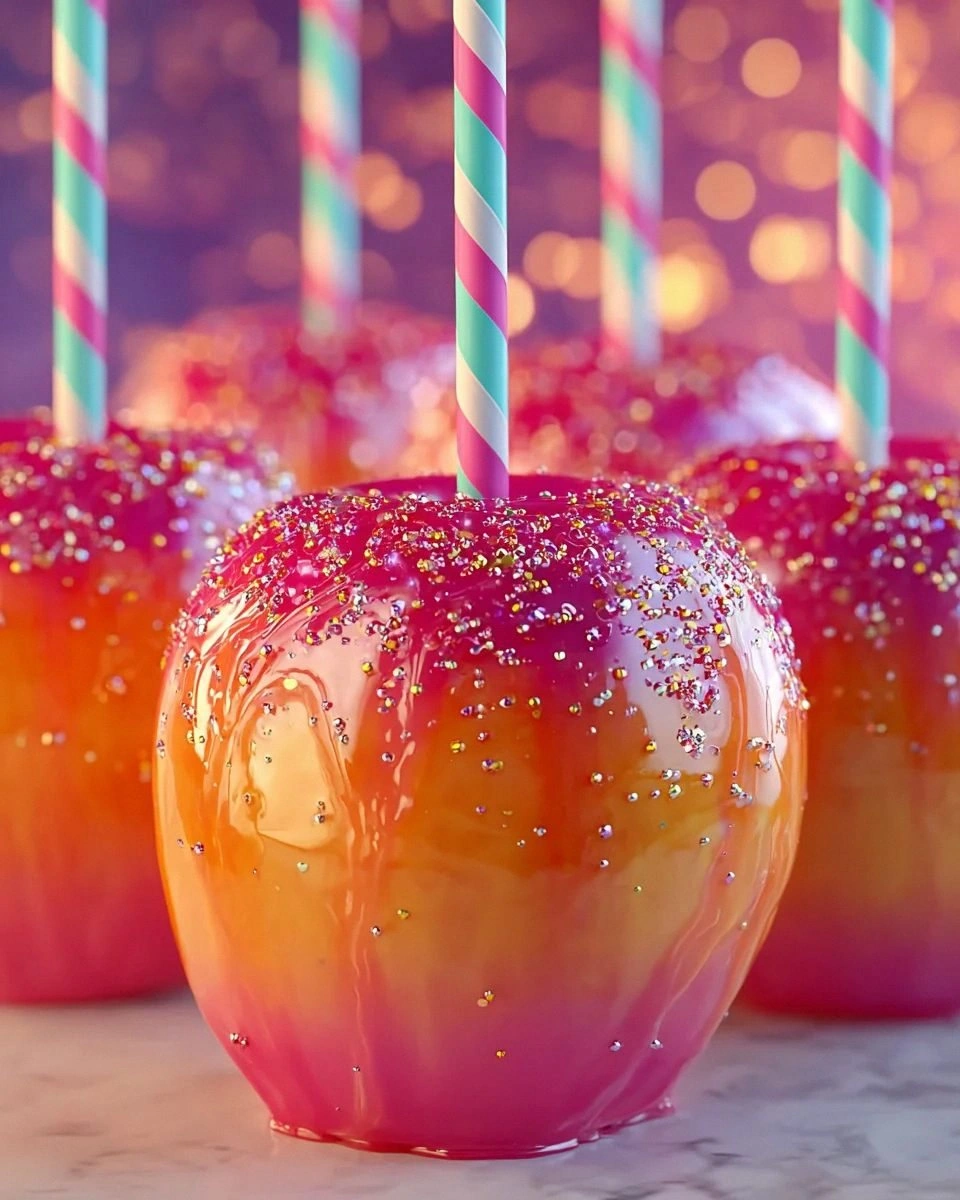
Picture this: the kitchen fills with the sweet perfume of melted sugar, a faint buttery aroma that whispers promises of crisp, glossy perfection. The sound of the candy coating bubbling like a gentle brook, the bright orange‑red swirl of food coloring swirling in the pot, and the satisfying snap when you bite into a perfectly coated apple that still has that fresh, crunchy bite of the fruit beneath. My hands were slick with sugar, the sticks felt warm, and the whole scene looked like a sunset captured in edible form. I could almost see the orange‑pink hues of a twilight sky reflected in the glossy surface of each apple.
Most candy‑apple recipes get the balance wrong – either they’re too sweet, too sticky, or the coating cracks the moment you try to move them. I’ve tried the “quick‑dip” method, the “microwave‑melt” shortcut, and even a store‑bought glaze that promised “shiny finish.” Each time, something fell apart. The secret, I discovered, lies in a precise temperature, a pinch of butter for shine, and a daring dash of food‑color magic that gives that sunset glow without turning the coating into a gummy mess. This version uses a classic candy‑coating technique but adds a secret ingredient that keeps the glaze smooth and glossy, even after it cools.
I’m going to walk you through every single step — by the end, you’ll wonder how you ever made candy apples any other way. I dare you to taste this and not go back for seconds. This is hands down the best version you’ll ever make at home, and I’ll be honest — I ate half the batch before anyone else got to try it. Okay, ready for the game‑changer? Let’s dive in.
What Makes This Version Stand Out
- Taste: A balanced sweet‑but‑not‑overpowering flavor that lets the apple’s natural tartness shine through.
- Texture: A glass‑like crunch on the outside while the apple stays crisp and juicy inside.
- Simplicity: Uses pantry staples; no exotic ingredients or fancy equipment required.
- Uniqueness: The sunset‑gradient color is achieved with three food‑color drops, creating a natural‑looking ombré.
- Crowd Reaction: People can’t stop staring; it’s a show‑stopper at parties, fairs, and backyard gatherings.
- Ingredient Quality: Fresh, firm apples and a butter‑infused glaze guarantee professional‑grade results.
- Cooking Method: Precise temperature control prevents crystallization, a common pitfall.
- Make‑Ahead Potential: You can prep the glaze and apples separately, then assemble just before serving.
Alright, let's break down exactly what goes into this masterpiece...
Inside the Ingredient List
The Flavor Base
The core of any great candy apple is the sugar‑corn‑syrup trio. Granulated sugar provides the sweetness, while light corn syrup prevents crystallization, giving that smooth, glass‑like finish. Unsalted butter adds a buttery sheen that catches the light like a sunset on water. If you skip the butter, expect a dull, matte coating that looks more like cheap candy floss than a gourmet treat.
A splash of vanilla extract brings depth, turning the simple sweet into a nuanced flavor profile. It’s the culinary equivalent of adding a bass line to a pop song—subtle but essential. If you’re allergic to vanilla, a dash of almond extract works, though it will shift the flavor toward nutty.
The Texture Crew
Crisp apples are the unsung heroes. I always reach for firm, slightly tart varieties like Granny Smith or Fuji because they hold their shape when dipped and provide a satisfying bite. The apple’s natural pectin also helps the glaze adhere better, reducing the dreaded “peel‑off” effect that happens with softer apples.
A pinch of salt might sound odd in a sweet glaze, but it balances the sugar and amplifies the fruit’s natural flavors. Think of it as the conductor that brings all the instruments together in harmony. If you’re watching sodium, a tiny pinch of sea salt works just as well.
The Unexpected Star
Food coloring is the secret to that sunset glow. By using three colors—red, orange, and yellow—and adding them at slightly different times, you create a natural gradient that mimics a real sunset. The key is to add the colors just before the glaze reaches its final temperature, so they blend without turning muddy.
The Final Flourish
Optional toppings like toasted almonds and sprinkles add texture and visual appeal. Toasted almonds give a nutty crunch that contrasts with the smooth glaze, while colorful sprinkles provide that carnival‑fair vibe. Feel free to experiment with crushed candy canes for a winter twist or shredded coconut for a tropical spin.
Everything's prepped? Good. Let's get into the real action...
The Method — Step by Step
First, give your apples a good rinse, then pat them completely dry with a clean kitchen towel. Any moisture will cause the glaze to seize, turning it grainy. Insert sturdy wooden sticks about an inch from the top, making sure they’re centered for even dipping. I like to soak the sticks in warm water for a minute so they don’t split when you pull the apple out of the hot glaze later.
In a heavy‑bottomed saucepan, combine 2 cups of granulated sugar, ½ cup of light corn syrup, and ¼ cup of water. Stir gently until the sugar dissolves, then place the pot over medium‑high heat. The mixture will start to bubble; this is the moment where you must stay vigilant. If you see the edges of the sugar turning amber too quickly, lower the heat to avoid scorching.
Add 2 tablespoons of unsalted butter once the mixture reaches a steady boil. The butter will melt and create a glossy sheen, turning the liquid into a buttery river of gold. Keep stirring with a heat‑proof silicone spatula, and watch as tiny bubbles rise to the surface. This is the moment of truth – the glaze should become smooth, with no grainy particles.
Now comes the temperature test. Clip a candy thermometer onto the side of the pot; you want the mixture to hit 300°F (149°C), the classic “hard crack” stage. Watch Out: If the temperature spikes above 310°F, the sugar will caramelize too hard and become brittle, cracking when you bite. Once it reaches 300°F, immediately remove the pot from heat; this is where the glaze stays glossy rather than turning grainy.
Off the heat, stir in 1 teaspoon of vanilla extract and ½ teaspoon of salt. Then, add three drops of red food coloring, two drops of orange, and one drop of yellow. Swirl gently with the spatula; you’ll see a beautiful gradient forming, like a sunrise captured in sugar. Let the glaze sit for 30 seconds so the colors meld but don’t fully blend.
Dip each apple into the glaze, turning it slowly to ensure an even coat. The glaze will initially cling thickly, then slide down, leaving a smooth, glossy shell. Hold the apple above the pot for a few seconds to let excess glaze drip off, then place it on a parchment‑lined baking sheet. If you want a thicker shell, dip the apple twice, letting the first layer set for about a minute before the second dip.
While the glaze is still tacky, sprinkle toasted almonds or colorful sprinkles over the surface. The toppings will adhere instantly thanks to the still‑warm sugar. For a uniform look, use a small sieve to dust the sprinkles; this prevents clumps and ensures every apple looks like a work of art.
Allow the apples to set at room temperature for at least 15 minutes. The glaze will harden into a glass‑like shell that snaps cleanly when you bite. If you’re in a hurry, pop them in a cool (not cold) oven at 200°F for 5 minutes, but keep an eye on them—over‑cooking can cause the glaze to crack.
Once set, arrange the apples on a serving platter. Picture yourself pulling this out of the oven, the whole kitchen smelling incredible, the glaze catching the light like tiny suns. Serve immediately or store as instructed below. And now the fun part: enjoy the applause from friends who will ask, “How did you make these look so perfect?”
That's it — you did it. But hold on, I've got a few more tricks that'll take this to another level...
Insider Tricks for Flawless Results
The Temperature Rule Nobody Follows
Never rely on “look” alone; a candy thermometer is your best friend. The glaze must hit exactly 300°F; any deviation can cause crystallization or brittleness. I once tried to eyeball the temperature and ended up with a cloudy, grainy coating that looked like cheap car paint. Keep the thermometer calibrated and trust the numbers. Pro tip: If you don’t have a thermometer, you can test a drop of glaze in cold water—if it forms a hard, brittle thread, you’re at the right stage.
Why Your Nose Knows Best
Your sense of smell is a reliable indicator of when the glaze is ready. As the sugar reaches the hard‑crack stage, a faint caramel note emerges—nothing burnt, just a sweet, buttery perfume. If you smell a burnt odor, you’ve overshot the temperature and the glaze will turn bitter. Trust that nose; it’s a built‑in safety net that many cooks ignore.
The 5‑Minute Rest That Changes Everything
After you finish the glaze, let it rest for exactly five minutes before adding food coloring. This short pause lets the sugar molecules settle, preventing the colors from bleeding into each other. Skipping this step leads to a muddy, uniform pink rather than the vibrant sunset gradient. I once rushed this step and ended up with a bland, single‑tone coating that looked like a cheap carnival apple.
Stick Selection Secrets
Don’t use flimsy plastic sticks; they bend under the weight of the glaze and can break mid‑dip. Opt for sturdy wooden craft sticks or even metal skewers. Soak them in warm water for a minute before inserting; this prevents the wood from splitting and gives you a smooth grip while you dip.
The Double‑Dip Technique
If you crave an extra thick shell, dip each apple twice. The first dip creates a thin base; let it set for 60 seconds, then dip again for a richer, more robust coating. The second layer adheres better because the first layer is still slightly tacky, creating a seamless bond. This trick turns a simple treat into a show‑stopping centerpiece.
Cooling Without Cracking
Avoid rapid temperature changes. After the glaze sets, don’t place the apples directly in a refrigerator; the sudden chill can cause the sugar shell to crack. Instead, let them cool at room temperature for 15 minutes, then move them to a cool, dry place. If you must chill them quickly, use a fan to circulate air gently, reducing the temperature shock.
Creative Twists and Variations
This recipe is a playground. Here are some of my favorite ways to switch things up:
Spiced Autumn Apples
Add a pinch of ground cinnamon and a dash of nutmeg to the glaze before you add the food coloring. The warm spices give the coating an autumnal depth, perfect for a fall gathering. Pair with caramel‑drizzled apples for a truly seasonal treat.
Tropical Coconut Crunch
Swap the toasted almonds for unsweetened toasted coconut flakes. The coconut adds a chewy, fragrant texture that contrasts beautifully with the crisp apple. A hint of lime zest in the glaze lifts the flavor into a tropical vibe.
Chocolate‑Dipped Sunset
After the candy coating has set, drizzle dark chocolate over the top and sprinkle sea salt. The bitterness of the chocolate balances the sweetness, while the sea salt adds a sophisticated crunch. This version is a hit at adult‑only parties.
Berry‑Infused Glaze
Replace half of the water with pureed raspberry or strawberry puree before heating the sugar. The fruit puree adds a subtle tartness and a natural pink hue, reducing the need for food coloring. Top with fresh berries for a fresh, summery twist.
Nut‑Free Crunch
If you have nut allergies, use crushed pretzel pieces or pumpkin seeds instead of almonds. Both provide a salty crunch that complements the sweet glaze without introducing allergens.
Holiday Peppermint
For a winter wonderland, add crushed peppermint candy to the glaze after it reaches 300°F, then finish with white chocolate drizzle. The peppermint adds a cooling bite that pairs perfectly with the warm apple base, making it a festive favorite.
Storing and Bringing It Back to Life
Fridge Storage
Place the coated apples in an airtight container lined with parchment paper. Store in the refrigerator for up to 5 days. The glaze remains glossy, but the apple flesh may soften slightly; to revive the crispness, let the apples sit at room temperature for 10 minutes before serving.
Freezer Friendly
Wrap each apple individually in a layer of plastic wrap, then place them in a freezer‑safe zip‑lock bag. They freeze well for up to 2 months. When you’re ready to enjoy them, move them to the fridge to thaw overnight, then let them sit at room temperature for 15 minutes. The glaze stays intact because the sugar acts as a natural preservative.
Best Reheating Method
If the glaze looks a little dull after storage, gently reheat the apples on a low oven setting (250°F) for 5‑7 minutes. Add a tiny splash (about a teaspoon) of water to the pan before reheating; the steam revives the glaze’s shine without making it sticky. Serve immediately for that fresh‑out‑of‑the‑oven sparkle.