It started on a rainy Sunday afternoon when I was trying to rescue a batch of stale, half‑baked cookies that had been left out too long. The dough looked like it had been through a war, but the aroma of toasted sugar and peanut butter still lingered. I was about to throw them in the trash when a voice from the kitchen counter whispered, “Just bake them a little longer.” I was skeptical, but I followed the instruction and, to my astonishment, the cookies emerged soft, chewy, and bursting with a peanut butter glaze that coated every crumb like velvet. That moment was a revelation: I had stumbled upon the ultimate peanut butter cookie, and I couldn’t keep it to myself.
From that day forward, I’ve been on a mission to perfect the recipe, experimenting with ingredient ratios, baking temperatures, and even the type of peanut butter. The result? A cookie that balances the crunch of a crisp edge with a gooey, melt‑in‑your‑mouth center, all while maintaining a buttery, slightly salty finish that makes every bite addictive. I dare you to taste this and not go back for seconds. This is hands down the best version you’ll ever make at home, and it’s not just a cookie—it’s a confidence booster, a kitchen triumph, and a delicious reminder that even the simplest ingredients can create something extraordinary.
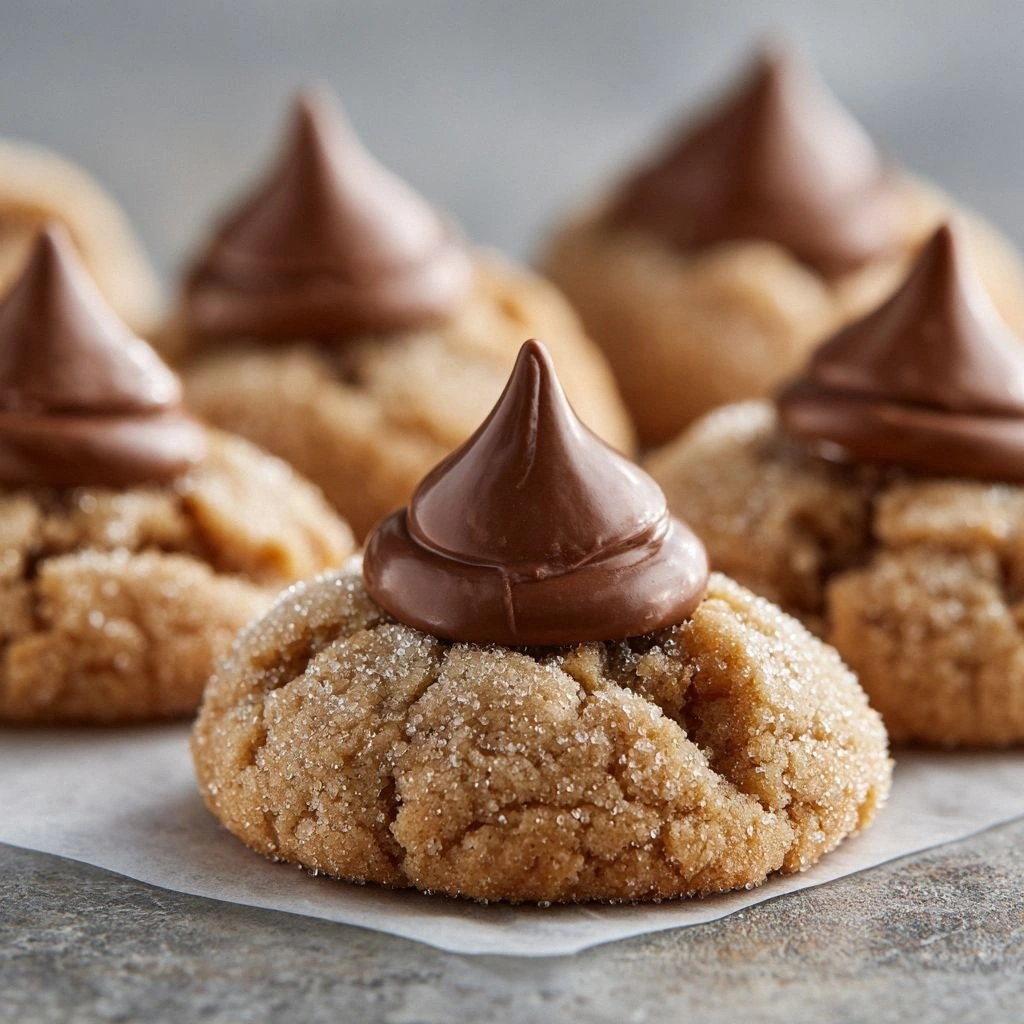
Picture yourself pulling the tray from the oven, the whole kitchen smelling incredible, the air thick with the scent of caramelized sugar and roasted peanuts. The cookies are golden at the edges, yet still tender inside, and when you break one open, the peanut butter glaze oozes out, creating a glossy sheen that catches the light. The texture is a delightful contrast: the crisp bite followed by a chewy, buttery melt. This isn’t just a dessert; it’s a celebration of flavor, a testament to the power of simple, honest baking.
If you’ve ever struggled with peanut butter cookies that turn out too dry, too sweet, or with uneven textures, you’re not alone—and I’ve got the fix. I’ll walk you through every single step, from selecting the right peanut butter to mastering the baking time that keeps the cookies soft and chewy. By the end, you’ll wonder how you ever made them any other way.
What Makes This Version Stand Out
- Texture: The secret lies in the combination of butter and peanut butter, which creates a dough that is both airy and dense enough to hold its shape while remaining chewy.
- Flavor Depth: Brown sugar adds a caramel undertone that balances the natural sweetness of the peanut butter, giving each bite a layered taste profile.
- Glaze Finish: A thin coating of peanut butter glaze on the surface gives the cookies a glossy sheen and a burst of flavor that melts instantly.
- Ease of Prep: No fancy equipment needed—just a mixing bowl, a whisk, and a trusty oven. The recipe is straightforward yet delivers professional results.
- Make‑Ahead Friendly: The dough can be prepared up to 24 hours in advance, and the cookies bake beautifully even when frozen.
- Crowd‑Pleaser: Whether you’re hosting a gathering or simply treating yourself, these cookies are guaranteed to be a hit.
- Ingredient Quality: Using high‑quality, natural peanut butter and unsalted butter ensures a richer flavor and better texture.
- Adaptability: The recipe is a blank canvas—add chocolate chips, nuts, or spices to suit your taste.
Alright, let’s break down exactly what goes into this masterpiece…
Inside the Ingredient List
The Flavor Base
At the heart of any cookie is the flour and leavening. In this recipe, we use two cups of all‑purpose flour combined with a teaspoon of baking soda and a teaspoon of salt. The baking soda not only helps the cookies rise but also neutralizes the acidity of the peanut butter, creating a smoother flavor. If you skip the baking soda, the cookies will be dense and flat. For a gluten‑free twist, swap the all‑purpose flour for a 1:1 blend of brown rice flour and tapioca starch.
The Texture Crew
The buttery foundation is built with half a cup of unsalted butter, softened to room temperature, and a cup each of granulated and brown sugar. The butter adds richness, while the sugars provide sweetness and caramelization. The brown sugar’s molasses content gives depth, and if you replace it with white sugar, the cookies will taste flatter and less complex. The egg—one whole—binds everything together and adds moisture. If you’re vegan, a flax egg or a commercial egg replacer can work, but the texture will differ slightly.
The Unexpected Star
The star of the show is the creamy peanut butter: one cup, room temperature. It’s the glue that holds the dough together, the flavor that defines the cookie, and the source of that signature chewy center. If you use chunky peanut butter, the texture will vary; the cookies will be slightly more rustic. For an extra kick, stir in a teaspoon of sea salt before baking—this balances the sweetness and amplifies the peanut flavor.
The Final Flourish
Chocolate chips are optional but highly recommended. A cup of semi‑sweet chips adds pockets of melty chocolate that contrast with the peanut butter. If you’re a fan of nuts, a handful of chopped peanuts or almonds can replace or complement the chips. The glaze—made by mixing a tablespoon of peanut butter with a tablespoon of melted butter—adds a glossy finish that melts into the cookie as soon as it cools.
Everything’s prepped? Good. Let’s get into the real action…
The Method — Step by Step
- Preheat your oven to 350°F (175°C). Line two baking sheets with parchment paper. The oven temperature is critical—too hot and the cookies will brown too quickly; too cool and they won’t set properly. The parchment ensures easy removal and a clean finish.
- Whisk the dry ingredients. In a medium bowl, combine the flour, baking soda, and salt. Toss them together so the leavening is evenly distributed. This step prevents clumps and guarantees a uniform rise. A quick visual check: the mixture should look like fine sand.
- Beat the butter and sugars. In a large bowl, cream the softened butter, granulated sugar, and brown sugar with an electric mixer on medium speed until the mixture is light and fluffy—about 2 minutes. The goal is to incorporate air; a pale, airy texture means the cookies will rise nicely.
- Add the egg and peanut butter. Beat in the egg and then the peanut butter until fully blended. The mixture should be smooth and glossy. At this point, you’ll notice a subtle nutty aroma. If the dough feels too sticky, chill it for 15 minutes.
- Combine wet and dry. Gradually fold the dry mixture into the wet, mixing on low speed until just combined. Over‑mixing can develop gluten, leading to tough cookies. The dough should be thick but pliable.
- Fold in chocolate chips. Gently stir in the chocolate chips, ensuring an even distribution. If you’re adding nuts, do so now as well. The chips will create pockets of molten chocolate that contrast with the chewy center.
- Form the dough. Using a tablespoon or a small cookie scoop, drop dough onto the prepared baking sheets, spacing each about 2 inches apart. Flatten each slightly with your hand; this helps the cookies spread evenly.
- Bake. Place the trays in the preheated oven and bake for 10–12 minutes, or until the edges are golden brown and the centers are set but still soft. The cookies will appear slightly under‑baked; they’ll firm up as they cool. Watch the time carefully—this is the trickiest step. The moment the edges start pulling away, you know they’re ready.
- Cool. Remove the cookies from the oven and let them rest on the sheet for 5 minutes. Then transfer them to a wire rack to cool completely. Cooling on the sheet allows the cookies to set, preventing them from becoming too soft.
- Glaze. While the cookies are still warm, brush each with a thin layer of peanut butter glaze. The glaze will melt into the cookie, creating a glossy finish. Let the glaze set for a minute before serving.
That’s it—you did it. But hold on, I've got a few more tricks that'll take this to another level…
Insider Tricks for Flawless Results
The Temperature Rule Nobody Follows
Many bakers set the oven to the lowest possible setting, but the sweet spot for these cookies is 350°F. If your oven runs hot, preheat for an extra 10 minutes and use an oven thermometer to confirm. A consistent temperature ensures even baking and prevents the edges from over‑browning while the centers remain soft.
Why Your Nose Knows Best
During the baking process, the aroma of caramelized sugar and roasted peanuts will rise. Trust your nose: when the smell starts to resemble a warm, buttery caramel, the cookies are ready to come out. If you’re unsure, use the visual cue of slightly golden edges.
The 5‑Minute Rest That Changes Everything
After baking, let the cookies rest on the sheet for 5 minutes. This rest period allows the structure to set, reducing the chance of breakage when transferring them to a rack. It also lets the glaze set just enough to hold its shape without becoming too runny.
The Secret to a Perfect Glaze
Mix equal parts peanut butter and melted butter for the glaze. The butter’s fat content helps the glaze spread evenly and creates a glossy finish. If you want a sweeter glaze, add a teaspoon of honey or maple syrup.
Make‑Ahead Magic
You can prepare the dough up to 24 hours in advance. Wrap it tightly in plastic wrap and store in the refrigerator. When ready to bake, let it sit at room temperature for 15 minutes before scooping. This ensures even baking and keeps the cookies chewy.
Creative Twists and Variations
This recipe is a playground. Here are some of my favorite ways to switch things up:
Chocolate‑Covered Peanut Butter
Dip half of each cookie in melted dark chocolate after baking, then let them set on parchment. The chocolate adds a crunchy, bittersweet contrast to the chewy center.
Salted Caramel Peanut Butter
Replace the brown sugar with a tablespoon of caramel sauce and sprinkle sea salt over the glaze. The result is a sweet‑salty symphony that’s perfect for dessert parties.
Nutty Crunch
Add a handful of chopped almonds or pecans to the dough. The nuts provide crunch and a nutty aroma that complements the peanut butter.
Spiced Peanut Butter
Stir in a pinch of cinnamon or a dash of cayenne pepper to the dough for a warm, spicy kick. This variation is surprisingly well‑balanced and adds depth.
Vegan Version
Swap the butter for coconut oil, use a flax egg (1 tablespoon ground flaxseed mixed with 3 tablespoons water), and choose a plant‑based peanut butter. The texture will be slightly denser, but the flavor remains authentic.
Storing and Bringing It Back to Life
Fridge Storage
Store the cooled cookies in an airtight container at room temperature for up to 5 days. The glaze will remain glossy, and the cookies will stay chewy.
Freezer Friendly
Place the cookies on a parchment‑lined tray and freeze until solid. Then transfer them to a freezer bag. They’ll keep for up to 3 months. Thaw at room temperature for 30 minutes before serving.
Best Reheating Method
Reheat in a preheated oven at 350°F for 5 minutes, or microwave on low for 10–15 seconds. Add a tiny splash of water to the bowl before microwaving; this steams the cookies back to a soft, chewy state.