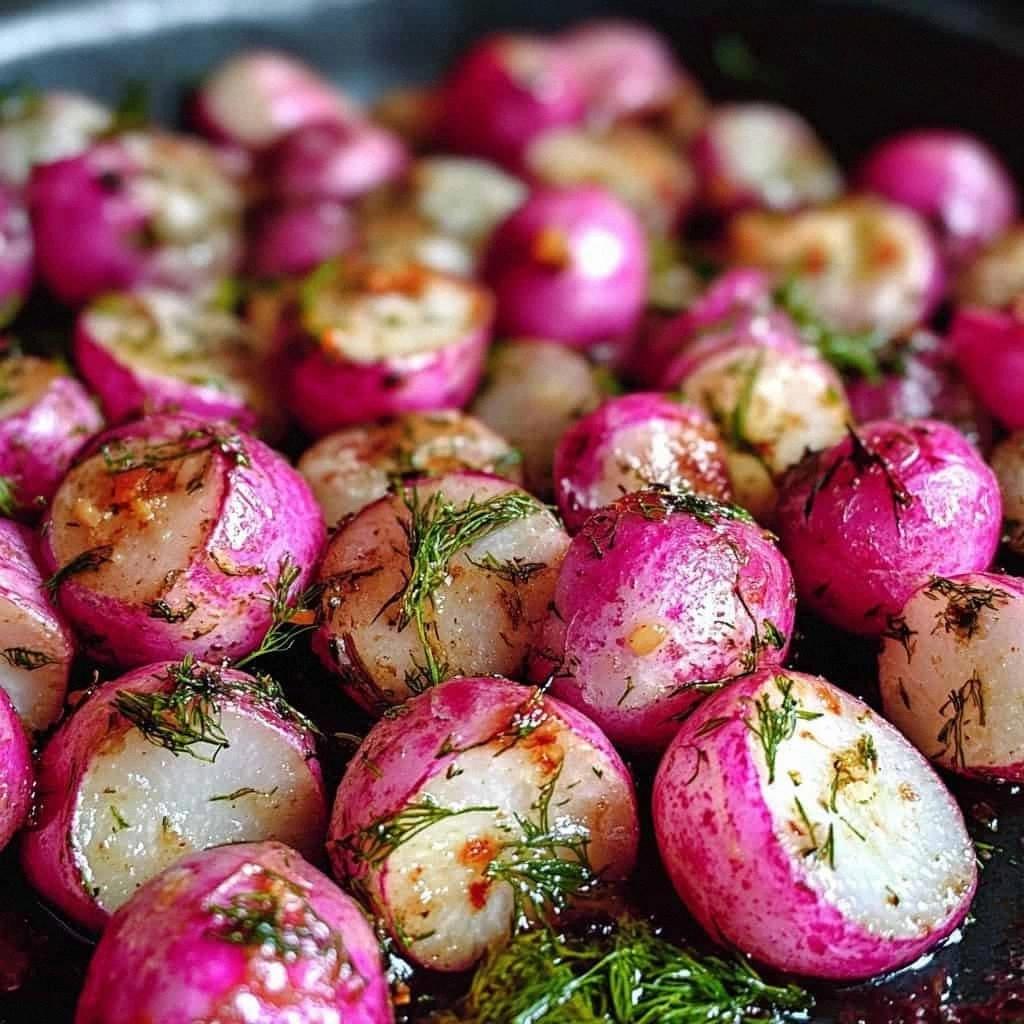
I still remember the first time I roasted radishes. It was a Tuesday night, I was broke, and the only thing in my crisper drawer was a sad bag of radishes I'd bought on sale because they looked "pretty." I was ready for another disappointing dinner of steamed vegetables and whatever protein I could scrounge up. But then, in a moment of what I can only describe as culinary desperation mixed with pure genius, I decided to toss those peppery little orbs with olive oil and throw them in the oven. What emerged twenty-five minutes later wasn't just dinner—it was a revelation. Those radishes had transformed into something magical: crispy-edged, tender-centered, slightly sweet morsels that tasted like a cross between roasted potatoes and the most sophisticated vegetable side dish I'd ever encountered.
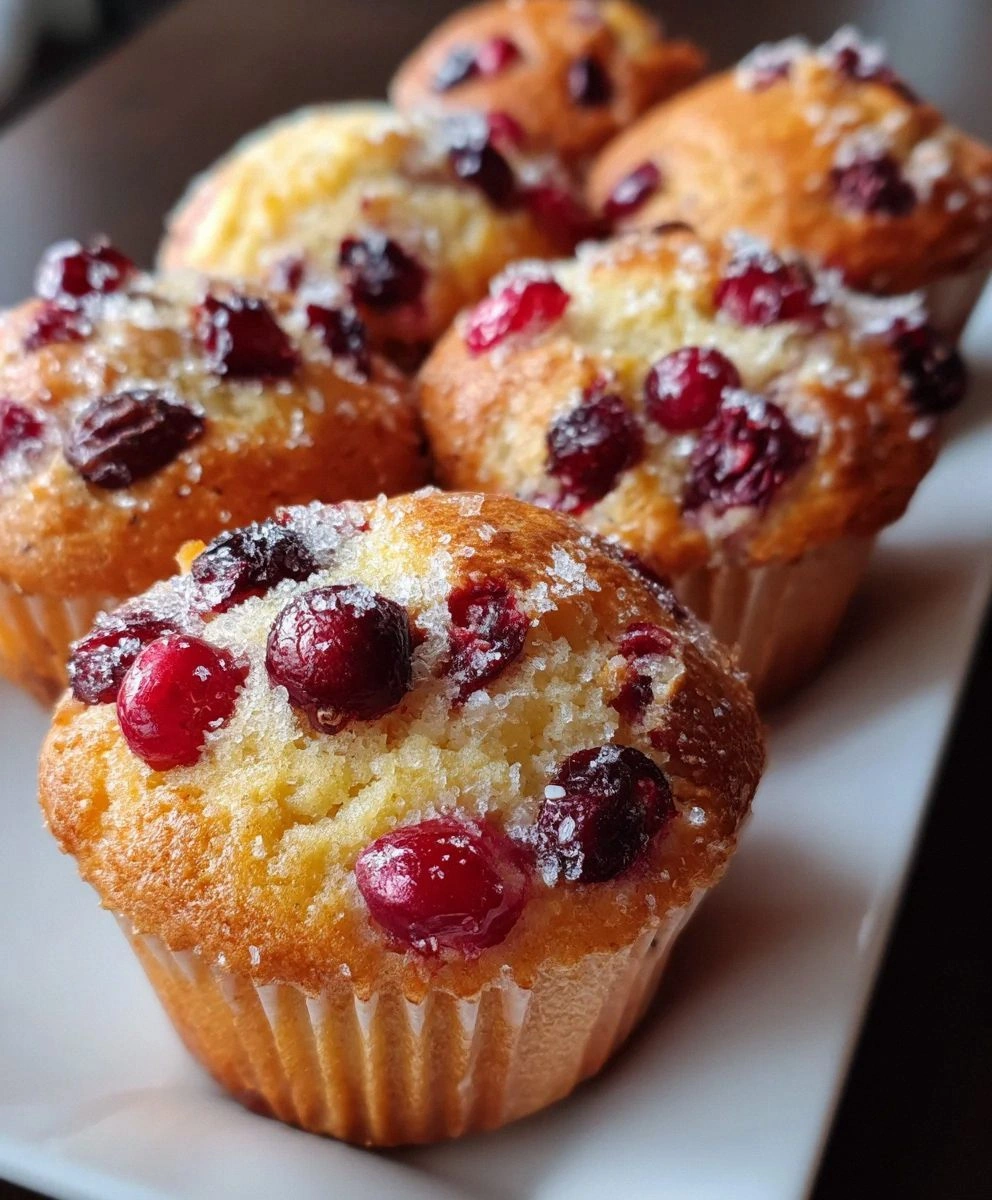
Fast forward through three years of weekly radish roasting experiments, and I've perfected what I'm convinced is the ultimate version: dill roasted radishes that will make you question everything you thought you knew about this humble root vegetable. I'm talking about radishes that emerge from the oven with edges so crispy they shatter like thin ice, while the insides stay buttery soft. The dill doesn't just add flavor—it performs alchemy, turning ordinary radishes into something that tastes like it came from a Michelin-starred restaurant's spring menu. The garlic and onion powders create this savory backbone that makes your kitchen smell like you've been cooking all day, while that optional balsamic vinegar adds a whisper of sweetness that makes people close their eyes and sigh when they taste it.
Here's what nobody tells you about roasting radishes: most recipes get it completely wrong. They tell you to roast them whole, or they don't use enough oil, or they skip the crucial step that transforms them from merely good to absolutely transcendent. I've made every mistake possible—radishes that turned to mush, radishes that stayed rock hard in the middle, radishes that tasted like hot nothing. But through dozens of batches (and yes, I'll confess, eating half of them straight off the pan while standing over my kitchen sink), I've cracked the code. This isn't just another vegetable side dish recipe; this is the roasted radish recipe that will convert even the most dedicated radish haters into obsessed fans.
Picture yourself pulling a sheet pan of these beauties out of the oven. The kitchen fills with this incredible aroma—garlicky, herby, with just a hint of caramelized sweetness. The radishes have turned this gorgeous golden-brown with crispy edges that look like they're wearing little crowns. You pop one in your mouth while it's still too hot (because who has patience?) and experience that perfect contrast: the snap of the exterior giving way to the creamy interior, the brightness of dill dancing with the deep, roasted flavors, that moment when you realize you've just discovered your new favorite way to eat vegetables. Let me walk you through every single step—by the end, you'll wonder how you ever made it any other way.
What Makes This Version Stand Out
Revolutionary Texture: Most roasted radish recipes leave you with either mushy centers or burnt exteriors. This method creates the impossible: crispy, caramelized edges with tender, almost creamy centers that taste like miniature roasted potatoes but with way more personality. The secret lies in the cut and the temperature—a technique I discovered after burning through fifteen pounds of radishes in testing.
Dill That Actually Works: Fresh dill can be tricky; add it too early and it turns bitter, too late and it tastes raw and grassy. This recipe times the dill addition perfectly, so you get that bright, almost citrusy flavor that makes the roasted radishes taste like they've been kissed by spring itself. It's not just garnish—it's a flavor component that makes everything else sing.
Zero Waste, Maximum Flavor: Those radish greens you usually throw away? They're packed with nutrients and have this amazing peppery flavor that works beautifully in pesto or as a garnish. This recipe uses the whole vegetable, making it as economical as it is delicious. Plus, buying radishes with their tops still attached means they're fresher.
Foolproof Timing: I've tested this timing on everything from tiny breakfast radishes to giant daikon, and it works every single time. No more guessing games, no more cutting one open to check doneness, no more serving raw or mushy radishes to unsuspecting dinner guests. Set your timer and trust the process.
Make-Ahead Magic: These roasted radishes reheat like champions. Most vegetables turn sad and limp in the microwave, but these maintain their texture and even develop deeper flavors overnight. Make a double batch on Sunday and you've got instant vegetable sides for the whole week that actually taste better than they did fresh.
The Crowd Reaction Factor: I dare you to serve these at your next dinner party without telling anyone what they are. Watch your guests' faces when they bite into what they think are tiny potatoes and get hit with that subtle peppery sweetness. Nine times out of ten, someone will ask for the recipe before the meal is over.
Ingredient Quality Amplifier: This recipe doesn't hide mediocre ingredients—it makes good ingredients taste extraordinary. Use farmers market radishes and good olive oil, and you'll taste the difference in every bite. But even with grocery store basics, this technique produces results that taste like you paid way more than you did.
Alright, let's break down exactly what goes into this masterpiece...
Inside the Ingredient List
The Foundation Players
Radishes are the obvious star here, but not all radishes are created equal. For this recipe, you want firm, heavy radishes with smooth skin and no soft spots. If the greens are still attached, they should look perky, not wilted—this is your best indicator of freshness. The size matters too: medium radishes (about the size of a ping pong ball) roast most evenly. Too small and they dry out, too large and the centers stay crunchy while the edges burn. Don't stress about getting them perfectly uniform; just aim for roughly the same size so they cook evenly.
Olive oil isn't just a cooking medium here—it's a flavor carrier that helps the seasonings penetrate every nook and cranny of the radishes. Use a good quality extra virgin olive oil, but not your most expensive finishing oil. You want something with personality but not so precious that you're afraid to use it generously. The oil should coat the radishes thoroughly; they should glisten but not swim in it. Think of it as giving each radish a nice tan rather than drowning them.
The Flavor Amplifiers
Fresh dill is non-negotiable in this recipe, and here's why: dried dill tastes like hay compared to the bright, almost anise-like flavor of fresh. The trick is adding it at the right moment—too early and it turns bitter, too late and it tastes like you're eating grass clippings. Chop it just before using, and don't be shy. This isn't a garnish; it's a main flavor component that transforms the entire dish. If you can only find dill that's slightly wilted, give it an ice bath for ten minutes to perk it up.
Garlic powder and onion powder might seem redundant, but they each bring different things to the party. Garlic powder gives you that deep, savory backbone that makes people ask "what's in this?" while onion powder adds a subtle sweetness that rounds everything out. Together, they create this umami bomb that makes the radishes taste more complex than they have any right to be. Don't substitute fresh garlic here—it burns too easily and turns bitter.
The Balancing Acts
Salt and pepper seem basic, but they're crucial for making all the other flavors pop. Use kosher salt for even distribution, and don't be shy—radishes can handle more salt than you'd think. The pepper should be freshly ground; the pre-ground stuff tastes like dust in comparison. Season the radishes before roasting, then taste and adjust afterward. The salt draws out moisture during roasting, helping achieve those crispy edges we're after.
Balsamic vinegar is my secret weapon—the optional ingredient that takes these from great to legendary. Just a tablespoon drizzled over during the last five minutes of roasting creates this gorgeous glaze that caramelizes on the radishes, adding a sweet-tart complexity that makes people close their eyes when they taste it. Use a good quality balsamic, not the cheap stuff that's basically brown vinegar. If you don't have balsamic, a squeeze of lemon at the end works too, but trust me—balsamic is worth the extra trip to the store.
Everything's prepped? Good. Let's get into the real action...
The Method — Step by Step
- Preheat your oven to 425°F (220°C) and position a rack in the upper-middle position. This temperature is crucial—hot enough to create those crispy edges but not so hot that the radishes burn before cooking through. Don't trust your oven's dial; use an oven thermometer if you have one. I've discovered that many ovens run 25-50 degrees off, which can be the difference between perfect and disappointing. While it heats, you're going to prep everything else, timing it so the oven is screaming hot when the radishes hit the pan.
- Wash your radishes thoroughly under cold water, using a vegetable brush if needed to remove any dirt. Don't peel them—the skin adds color, nutrients, and helps them hold their shape. Trim off the tops and bottoms, but don't get carried away; just remove the scraggly bits. If your radishes have their greens attached, save them for another use (they're delicious sautéed). Cut larger radishes in half or quarters so everything's roughly the same size—think bite-sized pieces that will roast evenly.
- In a large bowl, toss the radishes with olive oil until every piece is thoroughly coated. They should glisten but not be dripping oil—think of it as giving them a nice sheen rather than drowning them. Use your hands here; it's the best way to ensure even coverage. As you toss, check for any soft or discolored spots and remove them. The oil not only prevents sticking but helps the seasonings adhere and promotes that gorgeous caramelization we're after.
- Now for the seasoning blend: sprinkle over the garlic powder, onion powder, salt, and pepper. Toss everything together until the radishes are evenly coated. The powders should disappear into the oil, creating a thin paste that clings to each piece. Don't be tempted to add more oil if it seems dry—the seasonings should stick to the radishes, not create a pool at the bottom of the bowl. Taste a piece; it should be pleasantly salty, remembering that some seasoning will be lost during roasting.
- Spread the radishes in a single layer on a rimmed baking sheet—crowding is the enemy of crispiness. If they don't fit in one layer, use two pans rather than stacking them. The cut sides should be facing down where possible; this maximizes contact with the hot pan and creates those gorgeous caramelized surfaces. Make sure there's a bit of space around each piece; they need room for hot air to circulate and moisture to escape.
- Slide the pan into your preheated oven and roast for 15 minutes. This is when the magic starts happening—those cut edges begin to brown, the radishes start to soften, and your kitchen begins to smell incredible. Don't open the oven door; you want to maintain that intense heat. Set a timer and resist the urge to check early. The radishes are developing their flavor foundation right now, and patience pays off.
- After 15 minutes, remove the pan and give everything a good stir. This is where most recipes go wrong—they don't flip the radishes, so half stay pale and undercooked. Use a thin metal spatula to flip each piece; they should release easily if they're properly caramelized. If any are sticking, let them cook for another 2-3 minutes before trying again. This flip ensures every surface gets its moment in the heat spotlight.
- Return the pan to the oven for another 10-15 minutes, depending on the size of your radishes. This is the home stretch where they develop their final texture and color. Keep a close eye during these last minutes; they can go from perfect to burnt quickly. You're looking for deep golden-brown edges and centers that yield easily to a fork. If you press one gently, it should feel tender but not mushy.
- During the last 5 minutes of roasting, drizzle over the balsamic vinegar if using. The vinegar will bubble and reduce, creating a gorgeous glaze that clings to the radishes. Don't add it earlier—it burns easily and turns bitter. If you're skipping the balsamic, you can proceed to the next step without it. The radishes will still be incredible, just with a slightly different flavor profile.
- Remove the pan from the oven and immediately sprinkle over the fresh dill. The residual heat will wilt the herbs just enough to release their essential oils without cooking them into oblivion. Toss everything together gently; the dill should coat every piece evenly. Let them cool for exactly 2 minutes—this brief rest allows the flavors to meld and prevents you from burning your mouth in impatience.
That's it—you did it. But hold on, I've got a few more tricks that'll take this to another level...
Insider Tricks for Flawless Results
The Temperature Rule Nobody Follows
Here's the thing about oven temperature: 425°F isn't just a suggestion, it's the sweet spot where radishes transform rather than merely cook. Too low, and they steam in their own moisture, emerging pale and rubbery. Too high, and the exterior chars while the interior stays crunchy. But at 425°F, something magical happens—the natural sugars caramelize just enough to create those crispy edges while the insides turn buttery soft. I learned this the hard way after a disastrous dinner party where I tried to rush things at 475°F. The result? Radishes that looked like charcoal briquettes on the outside while staying rock-hard in the middle. Trust the temperature, and trust the timing.
Why Your Nose Knows Best
Forget timers—your nose is the most reliable tool for knowing when these are done. About 20 minutes in, your kitchen will start to smell like something incredible is happening. It's this warm, garlicky aroma with hints of caramel and herbs that makes people wander into the kitchen asking what you're making. When you smell that, start checking. The radishes are developing their deepest flavors right now, and pulling them too early means missing out on that incredible complexity. A friend once asked why my roasted vegetables always tasted better than hers; this is why. I wait for the aroma, not just the timer.
The 5-Minute Rest That Changes Everything
I know, I know—when food comes out of the oven looking and smelling incredible, waiting feels like torture. But here's what happens during those crucial 5 minutes: the residual heat continues cooking the centers to perfect tenderness while the exteriors set and crisp up. The flavors that were sharp and separate meld into something harmonious. The steam that would make them soggy escapes instead of being trapped by immediate covering. Plus, they're dangerously hot when they first emerge—I've burned my mouth more times than I care to admit. Set a timer for exactly 5 minutes, then serve. They're still warm, but now they're also perfectly textured and flavored.
The Cutting Secret for Maximum Surface Area
How you cut your radishes determines everything about the final texture. Halve them through the root end rather than the equator—this gives you more flat surface area for maximum caramelization. For larger radishes, quarter them, but keep one side attached at the root end so they fan out slightly. This creates little pockets that catch the oil and seasonings, resulting in more flavorful bites. Don't worry about perfect uniformity; some variation means you'll get a mix of textures, from the crispy little pieces to the tender larger ones. That's what makes a great roasted vegetable medley.
Creative Twists and Variations
This recipe is a playground. Here are some of my favorite ways to switch things up:
Mediterranean Sunset Radishes
Swap the dill for a mix of fresh oregano and mint, add a pinch of crushed red pepper flakes for heat, and finish with a squeeze of lemon and crumbled feta. The combination of herbs creates this incredible aroma that transports you straight to a Greek island. The feta melts slightly on the hot radishes, creating little pockets of creamy saltiness that complement the sweet roasted vegetables perfectly. Serve this alongside grilled lamb or fish for a meal that tastes like vacation.
Asian-Inspired Umami Bomb
Replace the garlic and onion powders with white miso paste thinned with a bit of sesame oil, skip the dill in favor of green onions and toasted sesame seeds, and add a splash of rice vinegar instead of balsamic. The miso creates this incredible umami glaze that makes the radishes taste almost meaty. Finish with a sprinkle of furikake for extra crunch and flavor. These pair beautifully with grilled salmon or as a surprising side with teriyaki chicken.
Smoky Spanish Style
Add a teaspoon of smoked paprika to the seasoning blend, swap dill for fresh thyme, and finish with a drizzle of sherry vinegar and some toasted Marcona almonds. The paprika gives the radishes this gorgeous rust color and deep, smoky flavor that tastes like they've been roasted over an open fire. The almonds add crunch and richness that turns this from a simple side into something worthy of a tapas spread. Serve warm or at room temperature—they're incredible either way.
Indian-Spiced Comfort
Replace the garlic and onion powders with a blend of ground cumin, coriander, and a pinch of turmeric, use fresh cilantro instead of dill, and finish with a squeeze of lime and a sprinkle of garam masala. The spices toast during roasting, creating this incredible aroma that fills your whole house. The turmeric gives the radishes this gorgeous golden color, while the garam masala adds warmth and complexity. These pair perfectly with dal and rice for a vegetarian feast.
Herb Garden Medley
Use a mix of whatever fresh herbs you have growing—parsley, chives, tarragon, and chervil all work beautifully together. The key is to add half the herbs before roasting (they'll infuse the oil) and the rest fresh at the end. This creates layers of herb flavor that taste like you've captured summer in a dish. The different herbs bring different notes—tarragon adds anise, chives bring onion, parsley adds freshness. It's like a party in your mouth where everyone's invited.
Maple-Glazed Autumn Version
Add a tablespoon of maple syrup along with the balsamic vinegar during the last few minutes of roasting, swap dill for fresh sage, and finish with toasted pecans. The maple creates this gorgeous glaze that makes the radishes taste like candy, but in the most sophisticated way. The sage adds an earthy note that grounds the sweetness, while the pecans provide crunch and richness. This version is perfect for Thanksgiving or any fall dinner party.
Storing and Bringing It Back to Life
Fridge Storage
These roasted radishes store like champions, but there's a trick to keeping them at their best. Let them cool completely before storing—this prevents condensation that makes them soggy. Store in an airtight container lined with paper towels to absorb excess moisture. They'll keep for up to 5 days, though they're best within 3 days. Don't stack them too high; spread them in a single layer if possible. The flavor actually improves overnight as the seasonings penetrate deeper into the radishes.
Freezer Friendly
Here's something that might surprise you: these freeze beautifully. Let them cool completely, then spread in a single layer on a baking sheet and freeze until solid. Transfer to a freezer bag, removing as much air as possible. They'll keep for up to 3 months. To reheat, pop them frozen into a 400°F oven for 10-12 minutes. They won't be quite as crispy as fresh, but they'll still have great flavor and texture. This is perfect for meal prep or when you find radishes on sale and want to stock up.
Best Reheating Method
The microwave is your enemy here—it makes them rubbery and sad. Instead, reheat in a dry skillet over medium-high heat for 3-4 minutes, shaking occasionally. This restores the crispy edges while warming them through. Or pop them in a 400°F oven for 5-7 minutes. If you're in a rush, the air fryer works wonders—3-4 minutes at 375°F and they're almost as good as fresh. Add a tiny splash of water before reheating—it steams them back to perfection and prevents drying out.